
How to Stain Wood Like a Pro: Complete Guide for Perfect Results
That feeling you get when you enter the room and you see stunning furniture made of wood that glows? The deep, rich color that will make you want to rub your fingers over the furniture? But the bulk of that gorgeousness is due to a single crucial element, which is stain.
I’ve worked on wood for more than 15 years, and I cannot recall how many instances I’ve witnessed of people messing up perfect work due to a poorly planned staining task. It’s heartbreaking, really. What I’ve discovered is staining wood isn’t an art or science. All you need is to know the fundamentals and avoid common mistakes that plague most DIYers.
If you’re planning to refinish the old dining table that you have inherited from your grandmother or build a custom shelf for your office, the correct stain will make an important difference in the end result between “eh, it’s okay” and “wow, did you hire a professional?” Let me show you all you need to learn to get those incredible results you’re looking for.
Learn More, Your Living Room with Marble Coffee Table
The Foundation: Understanding Wood Staining Basics
Wood staining has been in use for a long time; however, it really began to take off in America in the Colonial period, when woodworkers wanted to make cheaper woods appear similar to exotic hardwoods. Now, fast forward to the present day, and we’re able to choose from a variety of stain options that will make those early woodworkers turn their heads.
Staining isn’t just about changing color. It’s about increasing the natural appeal of the wood and keeping it safe for many decades to be. In the U.S. the wood finishing industry is worth more than $2.8 billion a year, in the estimation of the Department of Commerce, and has come up with sophisticated formulas that get deeply into wood fibers, creating aesthetic appeal as well as long-lasting durability.
However, let’s look past the marketing hype. The most important thing is to understand that different woods absorb stain in a different way. Pine, for example, is notoriously blotchy due to its varied grain density. Oak, on the contrary, is blessed with beautiful open pores that soak up stain in a uniform way. Maple? That’s the most difficult one. It often requires special treatment for a stain to properly accept it.
The most common myth I’ve heard is that darker staining’s necessarily provide more protection. This isn’t the case. The strength of the deck comes from the finish that you apply on top of the stain and not from the stain itself. I’ve seen folks apply dark stain, thinking it’ll help prolong the life of their deck, but then watch it peel and fade within one year due to the fact that they didn’t apply the correct topcoat..
Your Complete Staining Toolkit
Let me show you what you really need and not the things that big box stores attempt to convince you of. I’ve spent a lot of money on devices that promised flawless results but ended up collecting dust in my store.
Essential Tools:
- Natural bristle brushes made of high-end materials. (2-inch and 4-inches)
- Clean and non-linty rags (old T-shirts are great)
- Foam brushes for detail work
- Random orbital sander using various Grit sizes (120, 150, 220)
- Tack cloths or microfiber cloths
- Gloves made of Nitrile (your hands will be grateful)
- Painter’s tape and plastic sheeting
Materials You Can’t Skip:
- Conditioner for wood (especially to softwoods)
- The stain you choose (more on this in the next section)
- Mineral spirits to clean up
- Fine steel wool (#0000)
- Sandpaper progression: 120, 150, 220 grit
A Stain Selection Process: Oil-based staining penetrates deeper and gives you more time to work, which is ideal for those who are just beginning. Stains that are water-based dry quicker and don’t have a strong odor; however, they may increase the grain. Gel staining is great for vertical surfaces. They give you the best control over blotting.
Here’s a tip I learned from my mistakes. Always test your stain on a secluded area or scrap piece before you apply it. I once stained a whole bookshelf and then realized that “Golden Oak” looked more similar to “Yellowish Mess” on the specific wood I used.
The Step-by-Step Staining Process
Surface Preparation (This Is Where Most People Mess Up)
Gradually sand through the grits. Don’t skip the steps. Beginning with 120 is a good starting point; if getting rid of old finish, move up to 150 and end with 220. A finer finish than 220 could effectively stop stain penetration.
Clean between each grit by using a tack cloth. Dust is a major obstacle to smooth surfaces and will show in the final product like a neon sign.
Step 2: Apply Wood Conditioner (Don’t Even Think About Skipping This on Pine or Cherry)
This step differentiates professionals from amateurs. Apply conditioner using an application brush, then wait for 15 minutes, and then sand using 220 grit. This may sound like effort, but it’s actually preventing the blotchy, amateur-looking look that shouts “DIY disaster.”
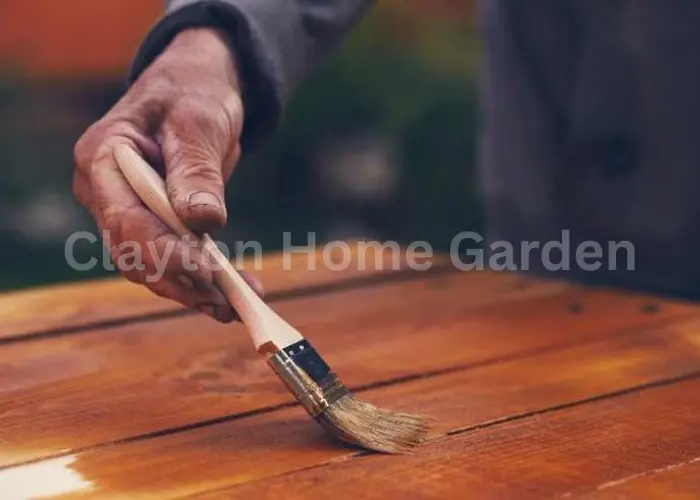
Step 3: The Actual Staining
Work in sections that are manageable, about 3 feet at one time. Apply stain along the grain by using long, smooth strokes. The key is to not just apply it and just hope for the best. You have a window of opportunity prior to the stain’s beginning to get set.
For the majority of oil-based stains, you’ll need to wash off any excess in 5-15 minutes. The longer you keep it, the darker it becomes, but there’s a limit to returns, where you’re making a mess.
Step 4: The Critical Wipe-Down
Clean rags and clean across the grain. Don’t be afraid to apply a bit of pressure. You want to eliminate the stain on the surface while leaving the wood with what’s been absorbed. Clean rags often, or a soiled rag will simply smear the stain across.
Expert Insights That Make the Difference
I contacted several experts in the industry to hear their opinions on what makes excellent staining outstanding.
Michael Rodriguez, Master Craftsman Michael Rodriguez, master craftsman at Heritage Woodworks in Austin, Texas, having more than the span of 25 years as well as a degree from the Rochester Institute of Technology’s School for American Crafts, said to him, “The biggest mistake I see is people rushing the prep work. You can’t stain your way out of poor surface preparation. I spend 70% of my time on prep and 30% on the actual finishing—that ratio is what separates professional results from amateur attempts.”
Sarah Chen, technical director at the American Wood Finishers Association, stressed the importance of the environment: “Temperature and humidity affect everything. We recommend staining when it’s between 65 and 75°F with relative humidity under 50%. I’ve seen beautiful projects ruined because someone tried to stain during a humid summer day in Florida.”
Bob Thompson, who’s been instructing the art of woodworking at North Carolina State University for 15 years, offered this knowledge: “Students always want to know the ‘secret’ to perfect staining. The truth is, there’s no magic bullet. It’s about understanding your materials, controlling your environment, and being patient with the process.”
According to the National Wood Flooring Association, the proper techniques for staining can prolong the lifespan of wooden surfaces as much as 40% when compared to untreated wood using a simple topcoat.
Learn More, Bathroom Decor Ideas To Inspire Your Soul
Real-World Success Stories
Let me provide a few instances that show the impact that the right technique can make.
Case Study 1: The Johnson Family Kitchen Renovation (Denver, Colorado)
The Johnsons had solid oak cabinets, which looked aged with their honey-colored finish in the 1980s. Instead of replacing them, which would have cost around $15,000 to restore.
The first attempt ended up being disastrous. They didn’t use conditioner and went straight from the old finish to the new stain. The result? Uneven, blotchy coverage that appeared more sloppy than when they began.
After sanding back to bare wood and following proper procedures—including wood conditioner and multiple thin coats—they achieved a beautiful espresso finish that transformed their kitchen. The total cost was $350 for materials and the two weekends of labor. The new design has added about $8,000 to their home’s value, as per their real estate agent.
Case Study 2: Murphy’s Custom Furniture (Portland, Oregon)
The local furniture manufacturer Tom Murphy was struggling with consistency among pieces of identical sets. Certain chairs would appear darker than others with the same stain mix.
The breakthrough was when he began to control shop temperature and humidity by using the help of a dehumidifier. He also enacted an exact timing schedule, which is exactly 10 minutes before wiping all the pieces. The result? A perfect color matching across the entire furniture set. This increased the satisfaction of his customers by 35% and also allowed him to charge higher prices.
Case Study 3: The Historic Restoration Project (Williamsburg, Virginia)
In the event that the Colonial Williamsburg Foundation needed to restore the furniture of the 18th century, they had to face the challenge of matching colors between furniture that had sat for more than 250 years. Utilizing traditional methods and a modern knowledge of the chemistry of wood, skilled craftsman David Miller developed a three-stage staining method that recreates the look of an old-fashioned piece.
The secret to success was using the stain application in diluted form over wood that was artificially aged by ammonia fumes—a method that saved the foundation more than 100,000 dollars compared to the process of using period-appropriate wood.
Your Practical Implementation Roadmap
Week 1: Planning and Preparation
- Try stain colors with some sample pieces
- Take all tools and other materials
- Make sure you have a suitable workspace that has the ability to ventilate
- Practice technique on scrap wood
Budget Breakdown for Typical Project:
- Stain of quality: $24-40 for a Quart
- Applicators and brushes Brushes and applicators: $15-25
- Prep materials and sandpaper. Materials for preparation and sandpaper: $20-30
- Wood conditioner: $15-20
- Protective equipment: $10-15
- Total Cost: $85-130 (covers about 100 sq ft)
Timeline Expectations:
- Surface preparation 1 to 2 days for e of furniture.
- Staining: one-day application 2 days drying
- Additional coats, if required, for each coat
- Final protective finish The final protective finish takes a minimum of 1-2 days
Essential Resources:
- The local Sherwin-Williams and Benjamin Moore stores for professional-grade staining
- Rockler as well as Woodcraft for tools that are specifically designed and expert advice
- YouTube channels such as Steve Ramsey’s “Woodworking for Mere Mortals” for learning through visuals
- Fine Woodworking magazine’s archive is online for solving specific problems.
Legal Requirements Take care to dispose of stain-soaked rags in a proper manner, as they can spontaneously ignite. Some municipalities have special disposal guidelines for oil-based finishing materials. Contact the local authority for waste management.
Common Mistakes and How to Avoid Them
“The ‘More Is Better’ The application of thick coats doesn’t guarantee deeper color. It can mean longer drying times and may lead to cracking. Create color by applying several thin coats instead.
Weather Warfare Syndrome: don’t battle Mother Nature. High humidity leads to slow drying, which can lead to finish issues. Low humidity could cause the stain to dry too quickly and leave lap marks.
The Impatience Factor The Impatience Factor: This is the biggest one. The rush between coats or the attempt to speed up drying using heating sources can result in low adhesion and failure of the finish. Allow stain time to fully penetrate and cure.
Tools that are not properly maintained: Using cheap brushes will leave bristles on your surface. Clean the brushes properly after use. Dry stain transforms excellent brushes into costly garbage.
What’s Next for Wood Staining
The market is moving towards more eco-friendly formulations, but without the effectiveness. Water-based staining is getting better at capturing their oily-like penetration substances, as new hybrid formulations bring together the very best qualities of each.
Smart technology is now becoming a part of the work environment. Companies such as Wagner are working on applicators with built-in sensors that allow for the same coverage rate. While we’re still not with robot staining, these tools allow professional-grade results to be more feasible for DIYers.
Here’s what I’m expecting: nanoparticle-enhanced stains, which give greater UV protection, and self-leveling formulations that minimize the appearance of application marks, and “smart” stains that change the color according to lighting conditions.
Your Next Steps
It’s not only about making something appear appealing, though that’s certainly an element. It’s about taking a raw object and making it into something elegant and practical for many years. Each bit of stained wood tells its own story, and if you use the right techniques, you can ensure that you’re proud to tell it.
Begin with a simple project, like an old side table that’s been lying on your patio. Learn the methods, become comfortable with the process, and increase your confidence. Once you’ve mastered the fundamentals and techniques, you’ll be gazing at the furniture thinking, “I could make that look amazing.”
Remember, even the best started somewhere. The difference between professional and amateur outcomes is often due to perseverance and attention to specifics, not the cost of equipment or a secret technique. Make sure you take your time, stick to the steps, and be confident that the outcomes will speak for themselves.