
12 Ways to Make Red Brick Look Rustic Farmhouse Style

Rustic farmhouse style with red brick isn’t about hiding your brick or pretending it doesn’t exist. It’s about working with it — pairing that warm, earthy brick with elements that soften, contrast, and frame it in a way that feels intentional instead of leftover from 1985.
The style pulls from two design traditions. Traditional farmhouse architecture — the kind you’d see across rural America from the 1800s through mid-1900s — favored honest materials, functional porches, simple gable roofs, and a connection to the surrounding landscape. Rustic design layers in natural textures, weathered wood, metal accents, and a slightly rougher, lived-in feel.
Red brick, especially the orange-red colonial brick common in homes built from the 1960s through 1990s, can actually anchor this aesthetic beautifully. The trick is adding the right farmhouse elements around it: wood trim painted in high-contrast colors, metal roofing, stone or wood siding on gables, deeper porches, and landscape choices that ground the whole thing.
What makes rustic farmhouse brick different from just “brick house with shutters” is the intentional mixing of materials and the emphasis on horizontal and vertical lines that break up the brick mass. According to architectural historians who study American vernacular building traditions, successful farmhouse design has always been about layering functional elements — porches for shade, wide eaves for rain protection, shutters that actually worked — in a way that looks cohesive but not overly designed.
Learn more:Ultra Modern Homes 2026 & Designs Everyone Is Talking About
12 Rustic Farmhouse Red Brick Designs That Actually Transform Your Home
Here’s the honest breakdown. Each design includes what makes it work, difficulty level, budget range, and which type of home it suits best.
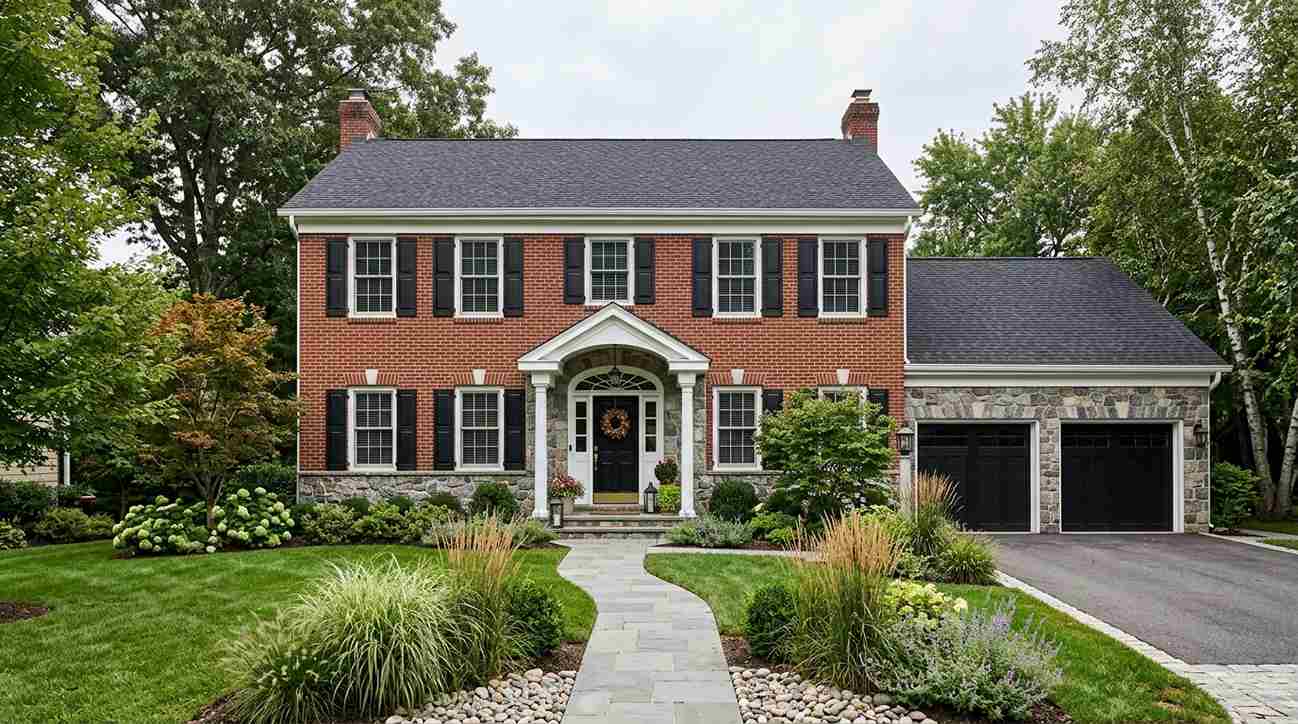
Design 1: Classic White Trim Contrast

The simplest and most budget-friendly approach. Paint all trim — window frames, fascia, soffits, door frames — in a crisp white (Benjamin Moore Simply White or Sherwin-Williams Pure White). Add black or deep charcoal shutters. Replace your front door with a solid wood or steel door in black, navy, or deep green.
Why it works: The high contrast breaks up the brick visually and gives your eye something crisp to focus on. It’s the same principle Joanna Gaines uses on Fixer Upper — sharp contrast creates instant farmhouse feel.
Timeline: One weekend for a single-story ranch if you’re DIYing. Two weekends for a two-story.
Best for: Brick ranches, split-levels, small colonials. Works in any climate zone.
My take: I did this first in my own house. Took me three full days, about $2,200 in materials. Biggest impact per dollar I’ve ever seen.
Design 2: Metal Roof Modern Farmhouse
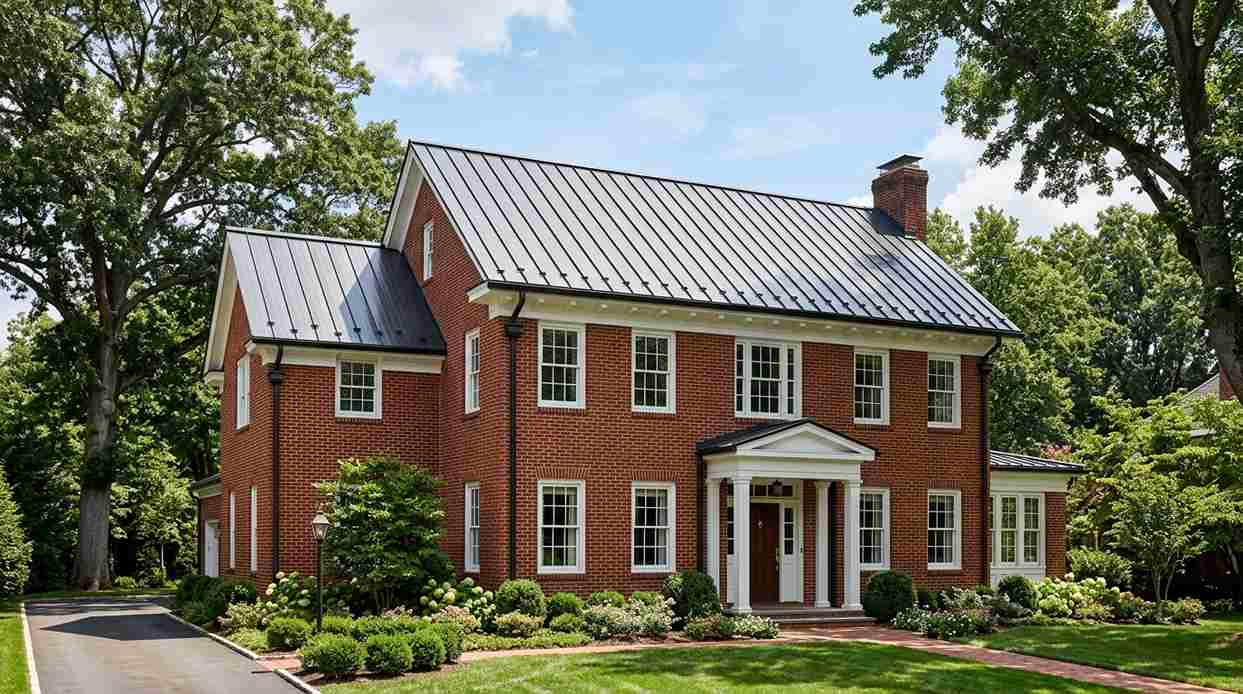
Replace your asphalt shingles with a standing seam metal roof in charcoal gray, black, or deep bronze. Pair it with white trim and consider adding exposed rafter tails under the eaves if your roofline allows.
Why it works: Metal roofing is one of the strongest farmhouse signals. The clean lines and slight industrial edge modernize the brick instantly. Plus, metal roofs last 40–70 years and reflect heat in southern climates.
Timeline: Professional install takes 3–7 days depending on home size.
Best for: Two-story homes, homes in zones with heavy snow or rain, rural or suburban settings.
Common mistake: Choosing a roof color that’s too similar to your brick tone. Go darker or much lighter — never match.
Learn more:Warm Desert Hallway Design Ideas for Southwestern Homes
Design 3: Board & Batten Gable Accent

If your home has visible gable ends (the triangular wall sections under the roof peak), cover them in vertical board and batten siding. Paint it white, cream, or a soft gray-blue. Leave the brick as-is everywhere else.
Why it works: The vertical lines create contrast against the horizontal brick pattern. It visually breaks up the mass of brick and adds the “mixed material” farmhouse look without touching most of your exterior.
Timeline: DIY-able in 2–3 weekends for someone comfortable with a saw and level. Professional install takes 2–4 days.
Best for: Cape Cods, bungalows, any home with prominent gable ends facing the street.
Material cost: Expect $800–$1,500 per gable end for materials (LP SmartSide or Hardie board and batten).
Design 4: Wraparound Porch Traditional
This one’s a bigger commitment. Add a full or partial wraparound porch with white columns, wood plank ceiling, and a metal or shingle roof that ties into your main roofline.
Why it works: Porches are the soul of farmhouse architecture. A deep porch softens the brick, adds usable outdoor space, and completely changes how your home reads from the street.
Timeline: 4–8 weeks for professional construction.
Best for: One-story brick homes with at least 12 feet of clearance in front. Works beautifully in Southern and Midwest climates where porches are culturally expected.
Reality check: This is your biggest investment on this list, but it’s also the one that adds the most resale value. According to Remodeling Magazine’s 2023 Cost vs Value report, a well-designed porch recoups 60–75% of its cost at resale in most markets.
Design 5: Stone & Brick Rustic Blend

Add natural stone veneer (real or manufactured) to your foundation, around the entry, or on accent walls. Choose a stone that contrasts with your brick — if your brick is orange-red, go with gray or tan stone.
Why it works: Mixing brick and stone is a classic farmhouse move. It adds texture, grounds the home visually, and makes the brick feel intentional instead of builder-standard.
Timeline: DIY-able if you’re experienced with masonry. Otherwise, professional install takes 1–2 weeks.
Best for: Brick homes in wooded or rural settings, homes with visible foundations, two-story colonials.
Pro tip: Use stone on the lower third of the home only. Going too high makes it look busy.
Design 6: Sliding Barn Door Entry

Install an exterior sliding barn door over your front entry or garage side door. Use reclaimed wood or new timber stained dark. Add heavy-duty black hardware.
Why it works: It’s a bold farmhouse statement piece that doesn’t require changing your structure. Just mount the track and hang the door.
Timeline: One day for most installs.
Best for: Brick homes with a covered entry or breezeway, homes with garage side access.
Budget hack: Real Sliding Hardware and Rustica Hardware sell pre-made barn door kits for $600–$1,200. Add your own door slab for another $200–$400.
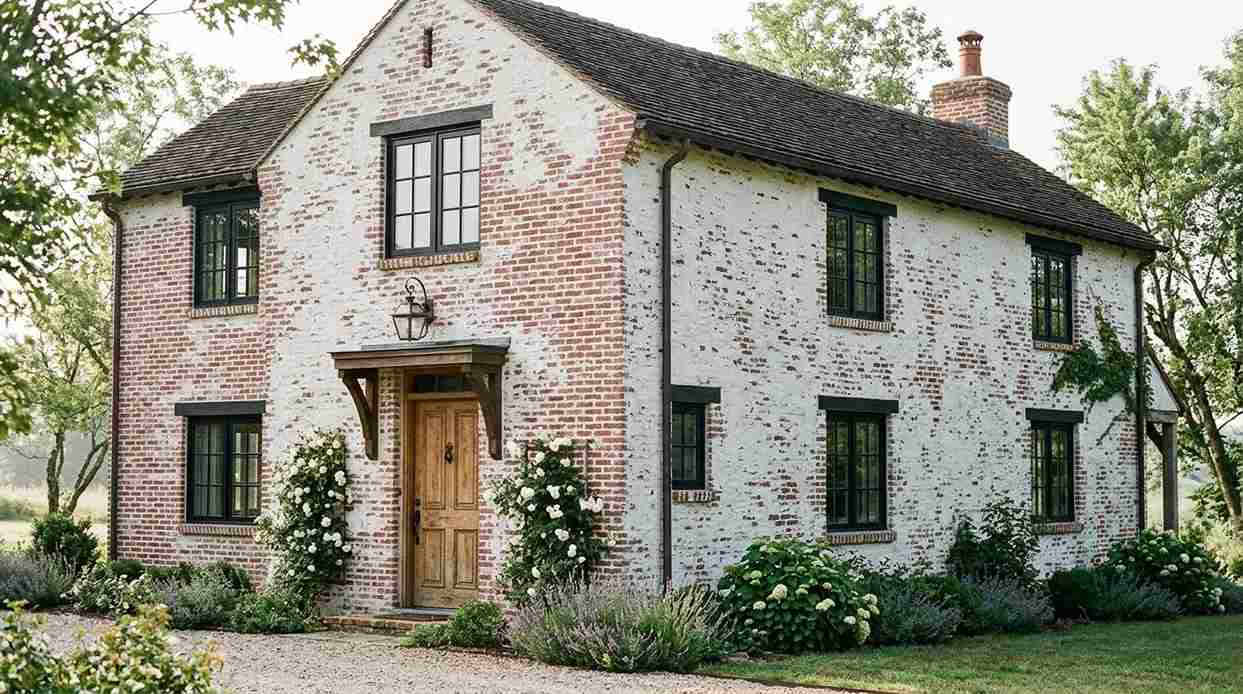
Design 7: Painted Brick Partial (German Schmear / Mortar Wash)

If your brick has uneven color or heavy orange tones you can’t stand, try a German schmear (also called mortar wash). This technique smears white mortar over the brick in an irregular, aged pattern — some brick shows through, some is mostly covered.
Why it works: It softens the brick, adds Old World European farmhouse character, and doesn’t fully seal the brick the way paint does.
Timeline: DIY-able in 2–4 days for an average home. Messy but doable.
Best for: Brick with color issues, homes in historic or rural settings, anyone wanting a softer rustic look.
Warning: This is still a permanent change. The mortar bonds to the brick. Don’t do this unless you’re committed.
Design 8: Black Window Frame Contrast

Replace your existing windows with black-framed windows (Pella, Andersen, or Marvin all offer black exterior options). Or, if your windows are newer, paint the exterior frames black.
Why it works: Black window frames against red brick create the same high-contrast modern farmhouse look you see in new builds, but on your existing home.
Timeline: Full window replacement: 1–3 days professional install. Painting existing frames: 1–2 days DIY.
Best for: Brick homes with older vinyl or aluminum windows, modern farmhouse fans, suburban settings.
Reality check: This is one of those updates that makes people ask if you built a new house. The visual impact is huge.
Design 9: Cupola & Gable Detail

Add a roofline cupola (small decorative tower) above your garage or main roofline. Or install decorative gable vents, corbels, or brackets under your eaves.
Why it works: These are classic farmhouse architectural details that add vertical interest and break up the roofline.
Timeline: Professional install for cupola: 1–2 days. DIY gable vents or brackets: half a day.
Best for: Brick homes with attached garages, homes with long flat rooflines, rural or hobby farm settings.
Budget note: Pre-fab cupolas run $800–$2,500 depending on size. Gable brackets are $50–$200 per set.
Design 10: Rustic Wood Pergola Entry
Build or install a timber pergola over your front entry or walkway. Use rough-sawn cedar or pressure-treated lumber stained dark. Let it age naturally.
Why it works: It adds a strong rustic focal point and frames your entry in a way that feels intentional and welcoming.
Timeline: DIY-able in 1–2 weekends. Kit install: one day.
Best for: Brick homes with small front porches, ranch-style homes, homes with long front walkways.
Where to buy: Wayfair, Costco, and Toja Grid all sell pergola kits for $800–$2,000.
Design 11: Horizontal Metal Siding Accent

Install horizontal corrugated metal siding panels on garage doors, gable ends, or as an accent wall. Choose black, charcoal, or weathered steel finish.
Why it works: It’s modern rustic — industrial edge mixed with farmhouse simplicity. The metal-against-brick contrast is striking.
Timeline: Professional install: 3–5 days. Advanced DIY: 1–2 weeks.
Best for: Modern farmhouse fans, brick ranches, homes in contemporary neighborhoods.
Pro tip: Use this sparingly. One or two accent areas max, or it starts feeling too industrial.
Design 12: Farmhouse Landscape Frame

Even if you’re not ready for structural changes, landscape design can transform how your brick reads. Plant boxwoods or hydrangeas in front of the foundation. Add a gravel or decomposed granite pathway. Flank your entry with tall black lanterns or matching planters.
Why it works: Strategic plantings soften the hard edges of brick and create a visual frame that makes the whole facade feel more intentional.
Timeline: One weekend for most front yard projects.
Best for: Any brick home, any budget, renters who can’t change the structure.
My honest take: I started here. Spent about $1,200 on plants, mulch, two big planters, and path gravel. It bought me time to figure out the bigger stuff, and it made me feel better pulling up every day while I planned the rest.
The 7 Mistakes That Ruin Rustic Farmhouse Brick Transformations — And How to Fix Them
1. Choosing cream or beige trim with orange-red brick.
The tones blend together and make everything look muddy. Go white or go dark — never in between.
2. Adding shutters that are too small for the windows.
Shutters should be half the width of the window. Measure before you buy.
3. Mixing too many accent materials at once.
Brick + stone + metal + wood can work, but not all on the same wall. Spread them out.
4. Painting brick without consulting a masonry expert first.
Some bricks shouldn’t be painted due to age or moisture issues. Get it checked.
5. Skipping the landscape.
Even the best architectural updates fall flat without intentional landscaping.
6. Using farmhouse details that don’t match your home’s architecture.
A ranch doesn’t need a two-story porch column. Match the scale to your house.
7. Doing everything at once and burning out halfway through.
Pick one design approach. Finish it. Live with it. Then move to the next phase if you want. According to landscape architect Kelly Norris, phased updates allow you to adjust based on what actually works for your home’s specific light, climate, and daily use — not just what looked good in your head.
CLOSING
This isn’t about chasing a trend or copying someone else’s house. It’s about making your brick home feel like yours — the kind of place you’re proud to pull up to, the kind of space that reflects the life you’re building inside it.
The best part? You don’t need to start from scratch. You’ve already got the bones. Now you’re just adding the details that make those bones sing.
Pick one of the 12 designs. Start small if you need to. But start. Because the home that feels most like you is the one you actually take the time to shape.