
Deck and Balcony Planters: Designs That Actually Work

But here’s the thing — not just any plants. And definitely not just any planters. Because if you’ve ever tried stuffing a few sad petunias into random pots and hoping for the best, you already know how that story ends.
This guide walks you through 12 planter designs that I’ve seen work beautifully on real decks and balconies — not Pinterest fantasies that fall apart the moment actual weather shows up. Some of these I’ve tried myself. Others I’ve stolen shamelessly from neighbors whose outdoor spaces made me stop and stare.
Learn more: Scandinavian Kitchen Design Ideas That Actually Work in 2026
Why Your Current Planter Setup Probably Isn’t Working
Before we get into what works, let’s talk about what doesn’t.
They use planters that are way too small. Those cute little 6-inch pots? They dry out in about four hours on a sunny deck. Your plants spend the entire summer stressed, and you spend it watering twice a day like it’s a part-time job.
They pick the wrong material for their climate. Terracotta looks gorgeous until it cracks in your first freeze. Plastic gets brittle and fades. Metal turns into a plant-cooking oven by mid-July.
They don’t think about weight. This one’s especially true for balconies. I’ve watched people load up gorgeous cedar boxes with wet soil, only to realize their balcony wasn’t built to handle 200 pounds in one corner.
1. Railing-Mounted Box Planters (The Space Saver)

If your deck or balcony is tight on floor space, railing planters are your best friend.
These hook directly onto your railing — no drilling, no permanent installation. You can fill them with trailing plants like ivy or petunias, upright herbs like basil and thyme, or even small vegetables like lettuce and spinach.
What works:
Most railing planters are 24 to 36 inches long and about 6 to 8 inches deep. That’s enough for root growth if you’re not trying to grow tomatoes there.
I’ve had the best luck with resin models. They don’t crack in winter, they’re light enough that they won’t stress your railing, and they come in colors that don’t look like cheap plastic.
Watch out for:
Wind. If you’re on a high balcony or your deck is exposed, a strong gust can flip these right off the railing. Use the included brackets. All of them.
And check your railing width before you order. Some planters only fit railings up to 4 inches wide. If yours is thicker, you’ll need adjustable hooks.
2. Elevated Cedar Planter Boxes (The Classic)

There’s a reason these show up on every “deck inspiration” blog post you’ve ever seen.
Cedar naturally resists rot and insects. It weathers into this soft gray color that looks expensive without trying. And if you build or buy one with legs that bring it up to waist height, you don’t have to bend over every time you want to check on your plants.
What works:
Look for boxes that are at least 10 to 12 inches deep if you want to grow anything more ambitious than annual flowers. Herbs, peppers, small shrubs — they all need decent root space.
I put two of these on my deck three years ago, planted them with a mix of lavender, rosemary, and ornamental grasses, and they’ve asked for almost nothing since. Water once or twice a week in summer. That’s it.
Watch out for:
Cedar gets expensive fast. A good elevated planter can run $150 to $300 depending on size. If that’s out of budget, pine works too — just expect to replace it every few years, or seal it annually.
3. Corner L-Shaped Planters (The Maximizer)

Most decks have at least one corner that’s basically dead space. Too awkward for furniture. Too small for anything useful.
Perfect for an L-shaped planter.
These fit snugly into corners and give you way more planting area than their footprint suggests. I’ve seen people use them for vertical herb gardens, layered flower displays, even small privacy screens with tall grasses or bamboo.
What works:
If you’re handy, you can build one pretty easily with treated lumber or composite decking boards. If not, there are pre-made resin versions that look decent and cost around $80 to $120.
Fill the bottom third with packing peanuts or empty plastic bottles to cut down on soil weight and cost. Your plants don’t need 18 inches of dirt — their roots will stay in the top half anyway.
Watch out for:
Drainage. Because these sit flush in a corner, water doesn’t always escape as easily. Drill extra holes if needed, and consider putting a thin layer of gravel at the bottom.
4. Tiered Plant Stands (The Showstopper)
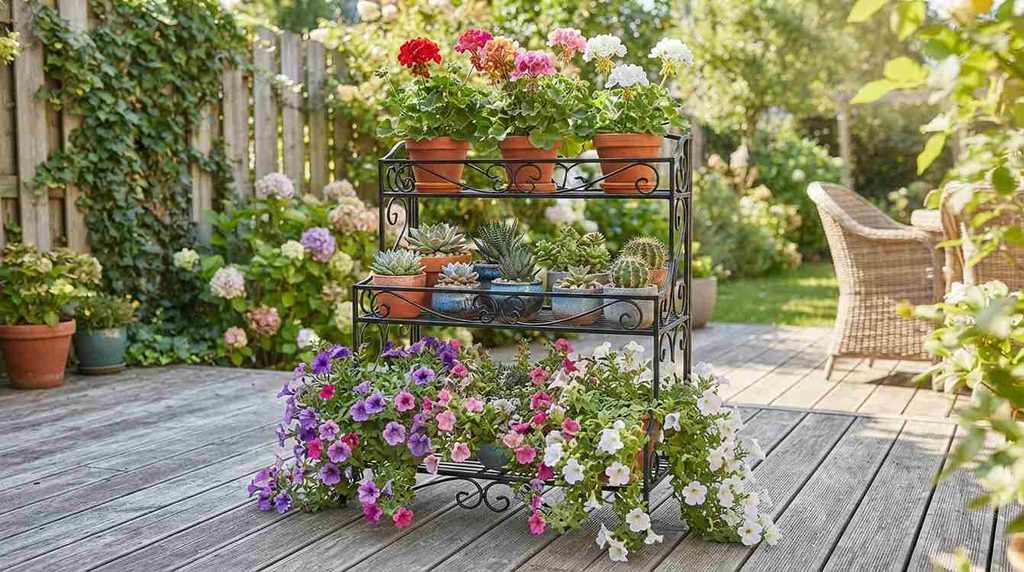
If you want your deck to look like something out of a magazine, tiered plant stands deliver.
These are basically stair-step shelves for your plants. You can mix heights, colors, textures — all in one compact footprint. I’ve seen people do all flowers, all succulents, even a mix of edible herbs on the bottom tiers and trailing flowers up top.
What works:
Metal tiered stands hold up better outdoors than wood, especially if you get one with a powder-coated finish. Rust-resistant is key.
Three tiers is the sweet spot. Two looks a little thin. Four starts to feel cluttered unless you’ve got a huge deck.
Watch out for:
These can get top-heavy, especially if you’re using bigger pots on the upper tiers. I learned this the hard way during a summer storm. Anchor it to your deck railing or a wall if you can, or stick to smaller, lighter pots up top.
5. Self-Watering Planters (The Lazy Genius Move)

Let’s be honest. Most of us forget to water. Or we’re traveling. Or it’s just too hot to go outside twice a day.
Self-watering planters have a built-in reservoir at the bottom. The soil wicks up moisture as needed. You fill the reservoir every week or two, and your plants handle the rest.
What works:
These are fantastic for decks that get full sun. I use them for tomatoes, peppers, and anything else that hates inconsistent watering.
Brands like Lechuza and Glowpea get mentioned a lot, but honestly, even the $30 versions from big-box stores work fine if you’re just growing flowers or herbs.
Watch out for:
You still have to monitor them. The water level indicators are helpful, but they’re not foolproof. And in heavy rain, the reservoir can overflow, which sometimes leads to root rot if your drainage holes are clogged.
6. Hanging Planters Off Deck Posts (The Vertical Garden)

If your deck has support posts, you’ve got free vertical real estate.
Hanging planters on shepherd’s hooks or wall-mounted brackets turn those posts into garden features. Ferns, trailing petunias, strawberries, even cherry tomatoes if the variety’s compact enough.
What works:
Use sturdy brackets rated for outdoor use. The cheap ones rust out in one season.
Coco coir-lined wire baskets look beautiful and old-school, but they dry out fast. If you go that route, plan on watering daily in summer. Resin or ceramic hanging pots need less attention.
Watch out for:
Height. If you hang them too low, people will walk into them. Too high, and you’ll need a step stool every time you want to water or deadhead flowers.
About eye level or just above works best in my experience.
7. Wooden Barrel Planters (The Rustic Statement)

Half whiskey barrels are a deck planting staple for a reason.
They’re big — usually 25 inches across and 18 inches deep — so you can grow almost anything. Small shrubs, dwarf fruit trees, large ornamental grasses, layered flower arrangements. And they look great even when nothing’s blooming.
What works:
Real whiskey barrels have better drainage and character than the resin knock-offs, but they’re heavier and more expensive. If you’re on a balcony, the resin version is probably smarter.
I’ve used these for years to grow Japanese maples, and they handle it beautifully.
Watch out for:
They dry out slower than smaller pots, but when they do dry out, they take forever to re-wet evenly. If the soil pulls away from the edges, water will just run straight through without soaking in. Add a wetting agent or water in stages.
8. Slim Vertical Tower Planters (The Herb Garden Hero)

These are tall, narrow, stacked planters — usually about 3 to 5 feet high and less than a foot wide.
Perfect for tight balconies or narrow deck corners where you want growing space but can’t sacrifice much floor area.
What works:
They’re fantastic for herbs and strawberries. I’ve also seen people grow lettuce, spinach, and trailing flowers.
GreenStalk is the name that comes up most, and yeah, they work. But there are cheaper versions that do the job if you’re just testing the concept.
Watch out for:
The top pockets dry out way faster than the bottom ones. You’ll end up watering unevenly unless you check each level. Some people rig up a drip irrigation tube down the center — worth it if you’re growing food.
9. Metal Trough Planters (The Modern Minimalist)

If your deck has a modern or industrial vibe, metal troughs nail the look.
These are long, low, rectangular planters — often galvanized steel or powder-coated aluminum. Clean lines. No fuss.
What works:
They’re fantastic for grouping plants with similar water and sun needs. I’ve seen beautiful setups with all succulents, all ornamental grasses, or even rows of identical boxwoods for a formal hedge look.
Metal drains well and won’t rot, crack, or fade.
Watch out for:
Metal heats up. In full sun, the soil inside can get uncomfortably hot for plant roots. Use them in partly shaded areas, or line the inside with landscape fabric or a layer of mulch to insulate the soil.
10. Window Box Planters on Deck Railings (The Cottage Garden Look)

Window boxes aren’t just for windows.
Mount them along your deck railing, and suddenly your whole outdoor space feels softer, more lived-in.
What works:
Go for boxes that are at least 8 inches deep and as long as your railing sections allow — usually 24 to 36 inches.
Fill them with a mix of upright plants in the back (geraniums, snapdragons, small grasses) and trailing plants in front (ivy, lobelia, sweet potato vine). The cascading effect is what makes this look work.
Watch out for:
Mounting hardware matters. Railing styles vary a lot, and not every window box bracket fits every railing. Measure twice.
And these need frequent watering. Shallow soil in an exposed box dries out fast.
11. Raised Garden Bed Planters (The Serious Grower)
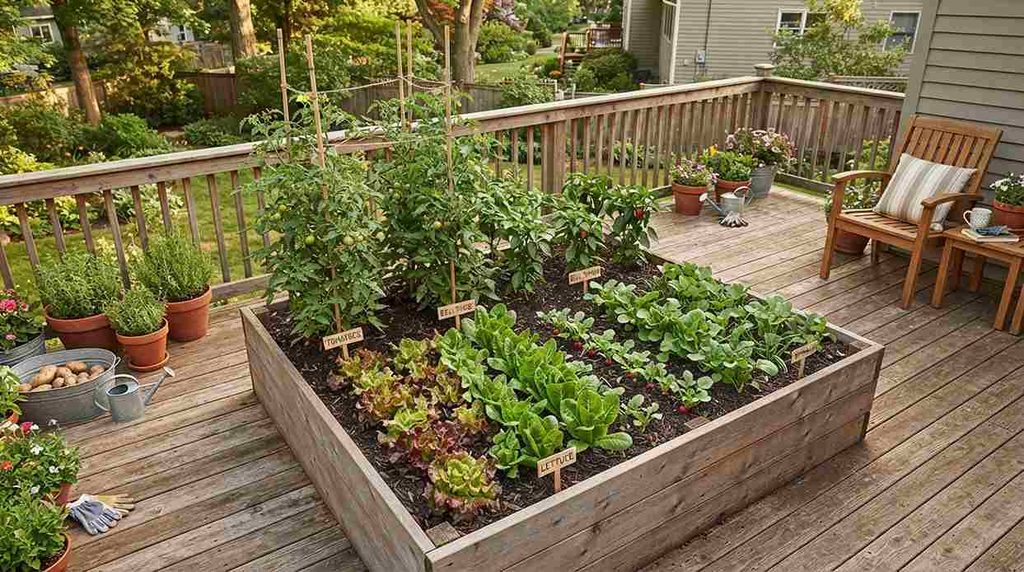
If your deck is big enough and strong enough to handle it, a raised garden bed opens up a whole new level of planting possibilities.
We’re talking full-size vegetable gardens, cutting flower beds, even small fruit bushes.
What works:
Go with composite or cedar. Treated lumber is cheaper, but some people worry about chemicals leaching into edible plants. I’ve used both and never had issues, but that’s a personal call.
Build or buy one that’s at least 12 inches deep — 18 if you want to grow root vegetables like carrots or potatoes.
Watch out for:
Weight. Seriously. A 4×4 raised bed filled with wet soil can weigh 500 pounds or more. Make sure your deck structure can handle it, especially if it’s elevated. If you’re not sure, talk to a structural engineer before you build.
12. Concrete and Fiber Clay Modern Planters (The Statement Piece)

Sometimes you just need one or two really good planters that make everything else look better.
Concrete and fiber clay (a lightweight concrete blend) planters bring serious style. They’re heavy enough to feel substantial, but modern fiber clay versions won’t break your back — or your balcony’s weight limit.
What works:
Use these for architectural plants — yucca, agave, ornamental grasses, small Japanese maples, boxwood topiaries. The planter should complement the plant, not compete with it.
And drainage. Some high-end planters don’t come with drainage holes (because aesthetics, apparently). Drill your own, or use them as cache pots with a plastic nursery pot inside.
How to Actually Keep These Planters Looking Good
Okay. You’ve picked your planters. You’ve filled them with plants. Now what?
Use quality potting mix, not garden soil. Garden soil compacts in containers and drowns roots. Potting mix stays loose and drains properly. Worth every penny.
Fertilize. Container plants can’t pull nutrients from the ground. They rely entirely on what’s in that pot. I use a slow-release granular fertilizer at planting time, then supplement with liquid feed every few weeks during the growing season.
Deadhead and prune. Spent flowers and leggy growth make even expensive planters look sad. Spend five minutes a week tidming things up, and everything looks ten times better.
Water in the morning. Evening watering works too, but morning gives plants time to dry out before nightfall, which cuts down on fungal issues.
Rotate them occasionally. If one side of your planter faces the sun all day, plants will lean that direction. Turn them every couple of weeks for even growth.
Final Thoughts
The best deck or balcony planter isn’t the trendiest one or the most expensive one.
It’s the one that fits your space, matches how much effort you’re actually willing to put in, and makes you smile when you step outside.Start with one or two. See what works. Add more as you figure out your rhythm.
And if something dies? That’s fine. I’ve killed more plants than I can count. You learn what your space likes and what it doesn’t.