
12 Chic Easter 2026: Designer Ideas to Elevate Your Spring Holiday Gathering

Easter is more than just a holiday. It’s an opportunity to create memorable moments around a beautifully-decorated table. Spring renewal is captured by pastel florals, wooden elements, bunny figurines and fresh greenery.
Learn more:12 Best Sofa Designs for Your Living Room in 2026 | Style Guidehttps://www.claytonhomesgarden.us/decor/sofa-designs/
Design 1: Vibrant Pastel Party With Balloon Garland

Design Elements:
- Dining Table made of Natural Wood with Painted Wooden Benches
- Rainbow Balloon Clusters in Pastel Colors (Suspended)
- Large mixed flower arrangements (pink roses, yellow ranunculus, baby’s breath and greenery).
- Cylindrical glasses with pink and blue coloured candles
- White Ceramic Place Setting with Pastel Napkins
- Colorful string/ribbon details
- The table centre is decorated with floral arrangements
Create this look using
Step 1. Prepare the table base
- Cover a table with a cream/white table runner or use a table made from natural wood.
- Paint chairs in a soft turquoise color (or use a tablecloth with pastel colors as a runner) if you are able to DIY.
- Set of white plates and pastel napkins in pink, mint, and soft yellow
Install Balloon Garland
- Buy or make your balloon garland in pastel colors
- Suspend table using fishing line 12-16 inches away from center
- Anchor made with clear tape and small weights
- Install balloons 2-3 hours before guests arrive. Heat can cause balloons to deflate.
Step 2: Write a Statement for the Centerpiece
- Fill clear glass cylinder vases with floral foam
- Add a layer of white baby breath to the base
- Add pink spray roses and yellow ranunculus
- Add some greenery (ruscus seeded eucalyptus) to your room.
- Arrange six vases in different heights on the middle table.
- Use pink and blue pillar candle to decorate your room
Step 3: Finishing Details
- Vases decorated with pastel bunny figures.
- Colorful napkin rings with twine ties
- Small potted succulents for place settings
- Pastel Easter egg scatter (optional)
Color palette : Cream base + Pastel Rainbow in pinks, yellows and blues (purples, oranges, and purples)
Design 2: Elegant Bunny Ear Napkin Tablescape

Design Elements:
- White Ceramic Chargers with Wood Chargers
- Fold white napkins into bunny ear shapes
- Flatware made of gold or brass
- Clear Glass Place Cards with Painted Easter Eggs
- Small vases in glass with moss, greenery and foliage
- Clustered Eggs with Speckled Patterns (Pastel Pink, Blue and Yellow)
- White spring flower: Ranunculus, cherry blossoms, baby’s breath
- Wood Table with Soft-focus Background
Create this look using
Step 1: Fold Bunny Ear Napkins
- Begin with a square, white linen napkin that is at least 18″x18″.
- Fold diagonally in order to form a triangle
- Fold up the bottom two-thirds of the way.
- Fold in the corners of both left and right to create a bunny-shaped shape
- When you fold the bottom flap, the ears will appear at the top.
- Pinterest offers video tutorials to help you create visual guides.
- Place charger plate or place setting next to
Step 2: Place Settings
- Natural Wood Round Charger Plate
- White ceramic salad plate + White dinner plate
- Flatware made of gold or brass brushed (use the correct spacing)
- Gold-rimmed glassware
- Fold the white napkin in bunny ears
Step 3: Create Vase Centerpieces
- Small clear glass cylinders, vases and budvases
- Fill the container half with moss or preserved moss.
- Add small branches and white flowers
- Combine with Easter eggs speckled in blues, pinks and yellows.
- Arrange five to seven small vases in the centre of the table.
Step 4: Add place cards
- Use small egg-shaped place card holders
- Write down your guests’ names in elegant calligraphy
- Position each setting
- Optional: paint eggs in pastel shades
Color palette : Whites, creams and woods. Pastels, pastels etc.
Design 3: Rustic Garden Bunny Centerpiece (Farmhouse Elegance)

Design Elements:
- Wood Slice base (4-6 Inches Diameter x 1/2 Inch Thickness)
- Moss foundation layer
- White ceramic bunny figurine (life-size or large)
- Blue hydrangea flowers
- Tulips white and pink.
- Baby’s Breath Fillers
- Easter eggs scattered in moss with speckles (whites, pinks, blues and purples)
- Burlap or Twine Bow Accent
- Vintage-style plant pot beside arrangement
Create this look using
Step 1: Prepare your base
- You can use a wood slice (tree stub) that is 4-6 inches wide.
- Sand smooth if rough; optional sealant
- Fill up a shallow container or place a floral Frog on bare wood.
- Covered with floral foam
Step 2: Create Moss layer
- Cover floral foam with Moss
- Create an organic and natural look
- Cover the entire side with moss
- Add preserved moss for extra texture
Step 3: Position Central Element
- Place a white ceramic bunny in the center.
- Height: 6-8 inches tall
- Use floral adhesive to ensure stability.
Step 4: Arrange Flowers
- Arrange blue/white hydrangeas on the back and sides of the bunny.
- Add Tulips in white and pink at different heights
- Fill in the gaps with Baby’s Breath or small foliage
- Bunny is the perfect center piece to create a lush and full look.
Step 5: Scatter Details
- Place Easter Eggs with Speckles on the Moss Base
- Colors : Pink, blue, yellow, and white
- You may also want to tuck small branches or twigs
- Add twine or gingham at the base
Step 6: Floral care
- Keep fresh by misting daily
- Change the water in your flower frog every 2-3 days.
- Lasts between 5-7 days
Color palette : white, cream, pink, brown, green, and natural wood
Design #4: Modern Minimalist Green & Brass Tablescape

Design Elements:
- Natural wood table
- Sage/olive green geometric table runner
- White Ceramic Plates (Simple and Modern)
- Sage green cloth napkins
- Flatware in brass/copper
- Tall vase with white tulips
- Brass candle holders
- Small potted succulents in a place setting
- Brass-framed place cards
- Natural wooden beads or stones scattered
Create this look using
Step 1: Table Foundation
- Select a table made of natural wood in a light color (oak or walnut)
- Use a table runner in sage green (either a geometric print or patterned botanical print).
- Visual Balance: Make sure the tabletop is visible from all angles.
Step 2: Place Settings
- White dinner plate + salad plate
- Sage green linen napkin (simple fold)
- Flatware made of brass or copper
- Glassware that has a brass rim, or is made of clear glass
- Minimalist brass charger plate (optional)
Step 3: Centerpiece
- A tall clear glass vase
- Only 7 white Tulips (no additional flowers, no greenery).
- Place the center of the runner
- Creates an elegant, sculptural look
Step 4: Lighting & Accents
- Two candle holders in brass or copper
- White or Cream pillar Candle
- Place the vase on either side
Step 5: Place Card Details
- Place card holders in rose gold or brass
- White cardstock and green lettering
- Simple, elegant text
Step 6: Surface Details
- Put a small succulent in a pot on each place setting.
- Small brass beads or wooden beads scattered around
- Natural Stone or Pebble Accents
- Intentional negative space
Color palette : White, sage, cream, wood, brass gold
Design 6: Multi-Piece Tablescape in Soft Pastel (Cottage Core Romance).

Design Elements:
- Multi-small center pieces (4-6 pieces).
- Wood Slice Bases with Flowers, Moss and Bunny Figurines
- Glass Jars Filled with Floral Arrangements
- Woven Baskets with Potted Herbs
- Ceramic bunny figures
- Speckled Easter eggs
- Fresh flowers – white roses, baby’s breath and pink ranunculus.
- Greenery: Eucalyptus, Ruscus, Moss, Herbs
- Candles in different holders
- Color blocking with cream and sage green
- Lace, ribbon and twine accents
Create this look using
Step 1: Plan Your Vignettes
- White bunny Base + Pink Flowers + Moss
- Moss base + eggs, baby’s Breath + Candle
- Floral arrangement using blush flowers
- Eucalyptus Only (Monochromatic).
- Small ceramic pot for succulents or herbs
- Nested eggs + moss
- single stem or minimal arrangement
- Grouping candles of 3-4 different heights and holders
Step 2: Create Base Elements
- Decorate wood slices with floral foam, moss, and moss
- Fill jars with water and cut flowers
- Arrange ceramic vases in a vase along with soil and plants
- Prepare woven baskets with straw/grass
Step 3: Create Individual Arrangements
- Each piece must stand alone
- Each height should be different (between 3″ and 8″).
- Use the same colors in all of your arrangements (pink, white and green).
- Use the same flowers but in different containers to create cohesion
Step 4. Stage on the table
- Create asymmetrical arrangements at the center table
- Alternate spacing: Cluster then open space, then cluster.
- Mixing vessel types creates visual interest
- Allow some breathing room between pieces
Step 5: Add Details
- Tie bows of twine to baskets
- Add lace doilies beneath wood slices
- Scatter the small eggs around your arrangement
- Add Candles to the Evening Ambience
- Use herbs and eucalyptus to add a fresh fragrance
Step 6: Style Props
- Add an old table runner or overlay
- Use cream and sage green napkins
- White Ceramic Plates as Contrast
- Use small easels to hold place cards
Color palette: blush pink, sage, green, cream, browns, muted golden
Design 7: Herb Garden Tablescape (Farm-to-Table Fresh)
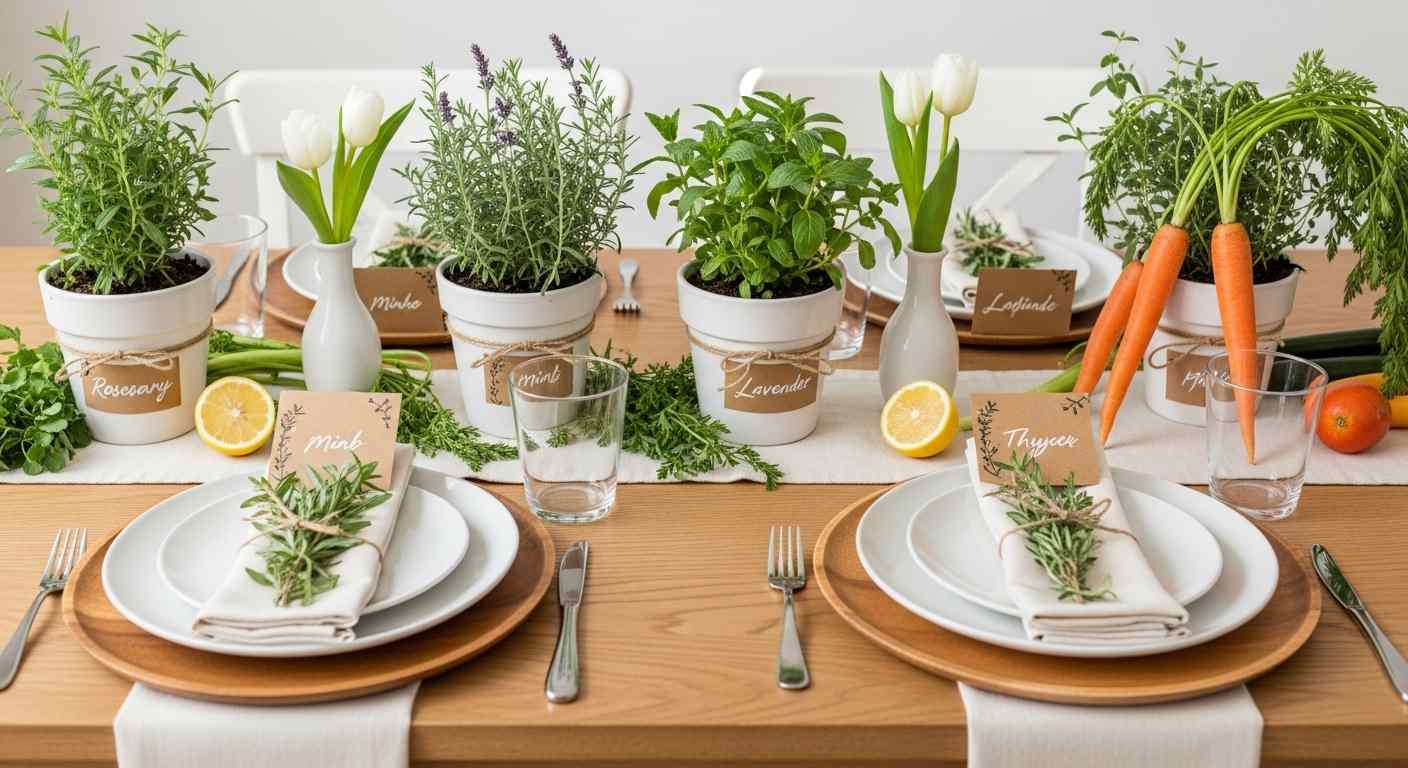

Design Elements:
- Natural wood table or runners
- Fresh herbs, potted: rosemary, mint, lavender, thyme, oregano
- Small terracotta or ceramic pots
- Herb markers or plant labels (wooden ones, not plastic)
- Spring Flower Mix (white tulips); ranunculus
- Moss and natural soil base
- Twine ties on pots
- Kraft paper place cards
- Natural linen napkins
- Simple white ceramic plates
- Whole carrots, lemon, fresh vegetables as decor elements
- Wooden chargers or coasters
How to Create This Look:
Step 1: Source Living Herbs
- Go to a local nursery or farmer’s market
- Choose from 6-8 potted herbs (one per guest or fewer if centerpiece to share)
- Types: rosemary (this is a classic Easter herb), mint, thyme, lavender, oregano, basil
- Make sure pots are food safe and in good condition
Optional: pot into prettier ceramic pots
Step 2: Prepare Herb Pots
- Pot into 4-6 inch ceramic or terracotta pots (colors that match or coordinate)
- Add drainage holes if needed
- Use quality potting soil
- Water well before event
Step 3: Label Each Herb
- Plant markers out of wood or kraft card stock.
- Herb name & 1-2 culinary uses
- Tie kraft label to pot with twine
- Conversational and or Educative Makes use of
Step 4: Build Table Layout
- Natural wood table or beige/cream table cover
- Chargers- wooden or woven placemats
- White ceramic dinner plates
- Linen napkins in natural (cream, sage or white)
- Make space for herb pots around the center of table
- Create asymmetrical arrangement
- Leave room for food service
- Step 5: Add Floral Elements
- Single stem vases with small white tulips
- Fresh ranunculus in coordinating pots
- Baby’s breath for airiness
- Twine-tied rosemary sprigs (fresh garland-style)
Step 6: Incorporate Fresh Elements
- Throw whole carrots (fresh from the farmer’s market)
- Squeeze fresh lemon slices or halves
- Place your whole peppercorns in small bowls
- Eggs(Guest Favor Option)Fresh Egg Shaped Soaps
Step 7: Styling Details
- Handwrite menu items inspired by herbs on kraft paper place cards
- Suggest dishes using served herbs
- Add little cards describing herb uses: “Rosemary for memory and celebration”
- Tie napkins with twine sprig
Color Palette: Beige, sage green, terracotta, natural wood brown, white, green foliage
Design 8: Pastel Easter Egg Runner Tablescape (Playful Elegance)

Design Elements:
- Natural wood table
- Easter eggs: soft pastel dyed or painted (pink, yellow, blue, lavender, white)
- Loose runner of eggs down table centre
- Moss or greenery base layer
- Simple white pillar candles
- Herbs or greenery arrangements between eggs in soil
- White ceramic plates
- Simple white or natural napkins
- Minimal florals (one stem white flower per setting — optional)
- Negative space intentionally left open
How to Create This Look:
Step 1: Prepare Easter Eggs
- Begin with real eggs (blown out) or plastic Easter eggs
- Dye or paint in soft pastels:
- Light pink: Food coloring + white egg dye or paint
- So soft yellow: Dilute turmeric or use yellow food coloring
- Dusty blue: Blue food gel + white
- Lavender Purple food coloring + white
- Keep some white for contrast
- Let dry fully (2-3 hours)
Optional: Add some delicate hand-painted detail (dots, lines, gold flakes)
Step 2: Create Greenery Base
- Moss or preserved greenery layers down table center
- Width: 8-12 inches
- Length: full table length
- Create organic, natural look
- Add small branches, twigs for texture
Step 3: Arrange Eggs
- Lay eggs on moss base loosely, in asymmetrical pattern
- Vary spacing (clustered and isolated)
- Create visual flow across table
Step 4: Interspersed Candles & Greenery
- Arrange white pillar candles at intervals
- Tuck potted herbs between eggs
- Add small flower stems (white baby’s breath, ranunculus, or tulips)
- Maintain balance without crowding
Step 5: Create Simple Place Settings
- White ceramic plates
- Natural linen or white napkins
- Minimal flatware
- Glass of water
1 optional: one stem of a white flower at each place
Step 6: Final Styling
- Make sure you double secure eggs before guests come over
- Testing the arrangement of candles (non-fire hazards)
- Step back and assess balance
- Adjust as needed for symmetry
Color Theme: Pastels (pink, yellow, blue, purple flower with white) on cream or natural base
Design 9: Elegant Blush Floral Garland Table Runner (Luxury Romance)

Design Elements:
- Fresh flowers’ 4-6 feet long garland
- Roses (garden roses and spray roses) in white, coral, and blush
- White ranunculus and ranunculus
- Fillers with baby’s breath and wax flower
- Trailing greenery such as eucalyptus, ruscus and ivy
- Do Floral Waterproof Tape and Flower Conditioning
- Garland on blush or cream linen table runner
- White or cream tablecloth
- Blush or white napkins
- Gold or brass flatware
- white plates to allow florals to be focal point
- Scattered fresh greenery
- Candles (this is natural, unscented so it doesn’t compete with flowers)
How to Create This Look:
Option A: Make Your Own Floral Garland (Advanced)
Step 1: Gather Materials
- One day before event, purchase fresh flowers
- Floral supplies: Roses, ranunculus, baby’s breath from a florist
- Fresh greenery: eucalyptus, ruscus, ivy
- Hydrated blocks of floral foam (soaked in water for 1 hour before use)
- Floral tape (green or clear)
- Floral scissors
- Florist wire
- Small water tubes (optional, to prolong freshness)
Step 2: Prepare Base Structure
- List soaked floral foam blocks (one every 12–18 inches)
- With floral tape or waterproof tape, secure to the table
- With help Creating a support system that won’t change during event
- Leave three to four inches overhang at each side; consider taping bottom of table runner to secure position.
Step 3: Build Base Layer
- Start with greenery: eucalyptus stems, ruscus, ivy trails
- Create full, organic base
- Let some greenery spill over the side of the table
- Establish natural, flowing line
Step 4: Add Focal Flowers
- Layer in largest roses first (garden roses, focal points)
- Evenly spaced (roughly every 12 inches)
- Complex and varied of real and fake heights: 6-10 inches above the table
- Create movement and visual interest
Fill in Second Blooms
- Supplement with ranunculus, spray roses smaller focal flowers
- Space between large roses
- Create lush, full look
- Ensure no large gaps
Step 6: Finalize with Fillers
- No flowers, just filler: Baby’s breath, wax flower, hypericum berries
- Tuck into all remaining spaces
- Create soft, romantic texture
- Making a Design Look like Something Natural: Garlands
Step 7: Add Details
- Intersperse candles along garland
- Scatter sprigs of greenery on table
- Make sure to stable and secure before guests arrived
- Water (misting) maintenance for event Plan
- Care During Event:
- Spray with water mist every 1-2 hours
- Storage: Store in a cool, dark place away from direct sunlight and heat.
- Remove wilted blooms immediately
- Garland: for best appearance, lasts 5-6 hours
Color Palette: Blush pink, coral, white, cream, sage green, eucalyptus gray
Design 10: Boho Basket & Botanical Tablescape (Free-Spirited Elegance)

Design Elements:
- Woven baskets of various sizes
- Dried grasses, pampas grass, wheat
- Fresh herbs (rosemary, lavender, mint)
- Easter eggs, loose (speckled, natural dyes)
- Fresh flowers in mixed blooms (whites, blush & cream tones)
- Macramé or woven placemats
- Cream or neutral linen napkins
- Brass or gold accents
- Natural wood chargers
- Greenery: eucalyptus, fern, trailing ivy
- Nature holders of candles (wood, brass, glass)
- Vintage or vintage-inspired serving pieces
- Stones or crystals (optional for boho theme)
How to Create This Look:
Step 1: Establish Table Foundation
- A natural wood table (ideal) or a cream/beige table cloth
- Woven placemats for each setting (macramé, rattan or jute)
- Wood or woven charger plates
- Ceramic dinner plates in white or cream.
Step 2: Create Basket Display
- Choose 4-6 baskets of different sizes (6-16 in diameter)
- There should be different types of weave and material
- Arrange asymmetrically down table center
- Baskets add up to focal point and height difference
Step 3: Fill the Baskets With Botanicals
- Basket 1: Pampas grass, wheat, dry flowers (white color, cream)
- Basket 2: Loose Easter eggs on moss (speckled, natural colors)
- Basket 3: Whole bundle of fresh herbs (thyme, rosemary, mint bundled with twine)
- Basket 4: A mix of greenery (eucalyptus, fern, ivy trails)
- Basket 5: Fresh white and cream flowers, greenery
- Basket 6: Candles, crystals or more botanical features
- Stand tall stems in baskets or lay them horizontally.
Step 4: Add Greenery & Trailing Elements
- Eucalyptus trails between baskets
- Ivy draping over basket edges
- Fern fronds creating movement
- Tuck smaller botanicals into gaps
Step 5: Incorporate Lighting
- Brass candlesticks, glass vases or wooden stands
- Position at different altitudes between baskets
- Create warm, ambient lighting
- Stable placement means safety from fire
Step 6: Layer Details
- Various untracked Easter eggs between baskets
- Crushed crystals or dirt for glimmer
- Herbs sprigs tied at each place setting (instead of napkin rings)
- Woven or twine napkin rings
Step 7: Create Artful Placemats
- Macramé placemat as base
- Layer with woven or natural fibre charger
- White ceramic plate centered
- Fresh herb sprig in natural linen napkin
- Brass or wood flatware
Color Palette: Cream, white, blush, taupe, gray and natural green, brass gold and woven browns
Design 11: Modern Green Garden Tablescape with Fresh Vegetables (Contemporary Farm-to-Table)

Design Elements:
- Seasonal vegetable components: carrots (with greens), asparagus, snap peas, radishes, young lettuces
- Stripe sage/cream runner or green table runner
- Wooden table or white/cream covered table
- Simple white ceramic plates
- Green linen napkins (sage or olive)
- Minimal flatware
- Clear glassware
- Unadorned green pillar candles in their holders
- Potted herb plants interspersed
- Scant white blooms (tulips or ranunculus)
- Twine, wrapping paper for vegetables
- Place cards that are modern or wooden chargers
- How to Create This Look:
- One Response to Create Green Table Foundation
- Center table runner, green or sage stripes
- White or cream tablecloth base
- Ensure color coordination with vegetables
Step 2: Prepare Fresh Vegetables
- Get from farmer’s market or grocery store
- Pick for aesthetics — choose colourful veggies with exposed stems/leaves:
- Carrots, preferably with tops, rainbow variety
- Bundles of fresh asparagus, tied with twine
- Snap peas still in pod
- Radishes with leaves
- Baby lettuces of various kinds
- Spring onions with green tops
- Rinse and pat dry
- Store vegetables in a pot of water until ready for arrangement (prevents wilting.)
Step 3: Create Vegetable Centerpiece
- Base: Low rectangular clear or white ceramic container
- Arrange vegetables artfully:
- Tall asparagus bundles in back
- Carrots bunched 3-5
- Snap peas and radishes interspersed
- Greens for soft texture around edges
- Change up heights and angles for interest
- Use twine or raffia to secure vegetable bundles
- Minimal greenery (optional | eucalyptus or preserved greenery)
Step Four: Add Fresh Flowers (In Moderation)
- Clear vase filled with white ranunculus or tulips
- One simple vase only
- Put alongside arrangement of vegetables (not competing)
- Keeping the spotlight on veg as a centerpiece
Step 5: Make Simple Place Settings
- White ceramic dinner plate
- Wooden or contemporary charger plate (optional)
- Green linen napkin
- Minimalist stainless or matte flatware
- Clear water glass
- Small herb pot as place card/favor (optional)
Part 6: Lighting & Detailing
- Plain glass pillar candle holders with green or cream pillar candles
- Place strategically for evening illumination
- Stay In touch with new, raw visual
- Avoid ornate or fussy elements
Step 7: Include Information
- Kraft paper place cards showing vegetables/menu items
- Vegetable sources (name of farmer’s market, farm, etc.
- Suggested preparations using table vegetables
- Creates farm-to-table narrative
Colors: Sage green, cream, white, vegetable greens, natural browns, matte metals
Design 12: Luxe Peach & Cream Tablescape with Gold Accents (Romantic Opulence)

Design Elements:
- Cream or champagne silk-like tablecloth
- Table runner (ombre or patterned) in peach tones
- Gold or champagne charger plates
- White ceramic dinner plates (with or without the gold rim)
- Peach or champagne silk napkins
- Gold flatware (dessert and diner pieces)
- Crystal or gold-rimmed glassware
- A large amount of garden roses (peach, coral, cream, blush)
- Accent blooms: ranunculus, sweet pea, spray roses
- Fillers: baby’s breath, wax flower
- Greenery: eucalyptus, ruscus, leather leaf
- Gold or crystal candlesticks
- Cream pillar candles
- Floral place card holders
- Elegant gold-rimmed charger or placemat
How to Create This Look:
Step 1: Establish Luxe Base
- Tablecloth – cream or champagne (linen or silk type fabric)
- Ombre peach-to-cream table runner or peach
- Width: Runner should be 12-16 inches wide
- Ensure pristine, pressed appearance
Step 2: Create Formal Place Settings
- 12-13 inch champagne or gold charger plate
- (10 inches) White ceramic dinner plate with gold rim
- Peach or champagne silk napkin (linen or blend)
- Fancy napkin fold: triangle or rectangle with fancied-up drape
- Gold flatware, properly spaced:
- Salad fork, dinner fork on left of plate
- Dinner knife, salad knife to right of plate (blade in)
- Soup spoon rightmost
- Dessert fork/spoon above plate
- Water glass, crystal or gold-rimmed, above knife
- Champagne flute next to water glass (optional)
Step 3: Bold Floral Focal Point
- Tall narrow clear glass vase (16-24 inches)
- Fill with floral foam (pre-soaked)
- Always start with greenery: eucalyptus, ruscus, trailing leather leaf
- Insert focal flowers: garden roses in peach, coral, blush (4-6 blooms)
- Add in the secondary flowers: peach ranunculus, coral spray roses, white sweet pea
- Stuff it with babies breath and wax flower for body
- Create lush, abundant, romantic look
- Height: 10-14 inches (allows sightlines)
- Place at center of table runner
Step 4: Add Supporting Lighting
- Candelabros de oro o cristal (2-4 piezas)
- 6 to 8 inch tall, cream or ivory pillar candles
- Position in symmetrical fashion on either side of floral piece
- Provides intimate, warm lighting at night
Step 5: Style Place Cards
- White or cream cardstock
- Gold or peach calligraphy
- Put in a neutral holder (gold, crystal or floral)
- Position above each place setting
Optional: small peach or cream rose affixed to card
Step 6: Final Elegance Details
- Use coordinated gold metallics (all same tone: champagne, warm gold or rose gold)
- Inspect linen for creases and smoothness
- Put small favor or extra rose at each place setting
- Use unscented or lightly scented candles to accompany florals
- Napkins folded precisely
Step 7: Quality Check
- Take a step back and evaluate color ratios
- Ensure floral arrangement is proportionate
- Double check that all place settings are identical
- Look for spills or even imperfections
- Adjust lighting for evening ambiance
Colors: Cream, champagne, peach, blush, coral, ivory, gold & sage green (accents)