
Outdoor Mural Ideas: Waterproof, DIY & Brick Wall Guide 2026

Every day, you walk by a concrete fence. It’s grey and cracked at one corner. You can forget about it. One weekend, your neighbor turns their identical wall into an incredible floor-to ceiling botanical garden painting. It stops everyone in the neighborhood dead in their tracks. Your fence suddenly feels like an insult towards the neighbors.
Most people don’t know that large outdoor wall murals are not just an artist’s skill. It never was. It’s not talent that is the real obstacle. The real barrier is not talent. It’s about knowing what materials can withstand rain and UV rays, which tools will speed up the process and how to tackle a large wall without getting overwhelmed.
Learn More, Best Small Studio Apartment
What will be the style of wall murals in 2026?
They’re even bigger now. Outdoor mural decoration is no longer a trend, but a cultural staple. Since 2020, cities in the United States and UK have invested millions of dollars into public murals. Homeowners followed suit. Houzz’s 2024 Landscaping trends report shows that exterior wall art is among the top five backyard upgrades requested for the third consecutive year.
What has changed? What changed? The outdoor paint technology has improved dramatically. Second, DIY outdoor wall art has exploded in popularity on sites like Pinterest and YouTube. This makes the techniques available to anyone who is willing to spend Saturday outdoors.
What is a Mural Decor?
Mural decoration is any large scale artwork that has been applied directly to the wall, fence or exterior surface. A mural is a permanent part of architecture, unlike a framed canvas or hung painting. It turns flat surfaces into visual statements.
Outdoor murals are pieces that will be exposed to the weather, temperature changes, UV radiation and moisture. Most DIY projects fall short here. Many DIY projects fail because people use indoor paints and skip the primer. They wonder why their garden mural looks cracked and chalky the next spring.
What is the best material for outdoor murals?
Most blogs only skim the surface of this question, which is a very important one.
The gold standard of outdoor murals is 100% acrylic latex exterior paint. Golden Artist Colors produces an exterior paint line that is used by professional muralists. Sherwin Williams Emerald Exterior and Benjamin Moore’s Aura Exterior make excellent choices for large fills and base coats. In 2025, expect to pay $60-$85 per gallon on quality exterior paint.
Golden OPEN Acrylics ($15 to $25 per tube), which are great for custom colors and detail work, stay more workable outdoors. This is important when painting under direct sunlight. On a hot day, standard fast-drying Acrylics can dry out in less than five minutes. This causes brushstroke ridges to appear and uneven coverage.
A second sealer coat must be applied to large outdoor waterproof murals. Think of the rain in the Pacific Northwest or Florida’s humidity. Golden Archival Varnish is the professional’s choice. It provides UV protection, creates a water-resistant barrier and does not alter the color of your painted surface. One gallon costs $75 and covers 400 square feet.
Waterproof outdoor murals: How to make your art last

Preparation and sealing are the main factors that make a difference in a mural’s ability to survive three winters versus one that appears weathered even after just one.
Surface preparation is key. Start by washing the wall with pressure. Before applying anything, allow 48 to 72 hours for the wall to dry. Use a stiff bristle brush to remove loose mortar dust from brick wall murals. Fill in cracks using exterior grade caulk, and then sand the surface smooth after it has dried.
If you are working with brick or concrete, prime it first using a masonry primer. Zinsser Bullseye Primer 1-2-3 works on almost any exterior surface, and it creates excellent adhesion. If you skip this step, your colors will appear dull and uneven. The wall will absorb the pigment unevenly. No amount of additional coats will fix it.
Apply two coats of UV-resistant varnish after painting. You can work in the shade on a day with a lot of clouds. The direct sunlight will cause the varnish to cure much faster and produce a streaky, milky finish. Allow the varnish to cure completely between coats, usually 24 hours.
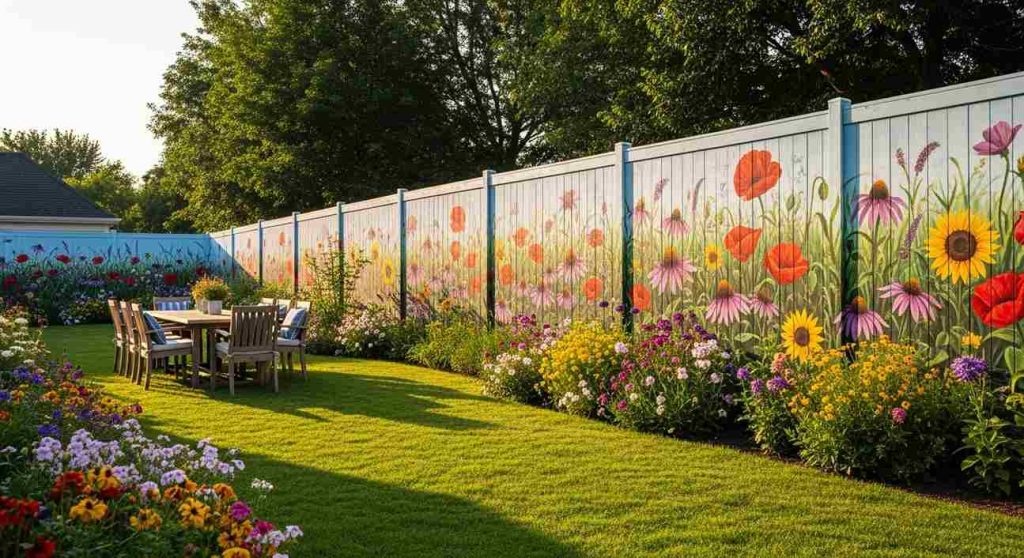
Choose the right design for your garden mural painting
The challenge of painting a garden mural is unique. It’s not like pure wall art. Both suffer when they clash. When they come together, the results are extraordinary.
Garden wall murals that are most effective either expand the garden by painting trompe-l’oeil depth or imaginary paths, or large botanical prints that make it feel as if the plants were still growing — or contrast with an abstract or geometric design which frames the living gardens in the center.
Cool blues, deep-greens and soft lavenders are perfect for a shaded north-facing garden wall. They complement the low-light environment without competing with it. Warm ochres and burnt oranges are perfect for a south-facing fence that is drenched in sunlight.
Outdoor Mural Stencils – The DIY Alternative That Works
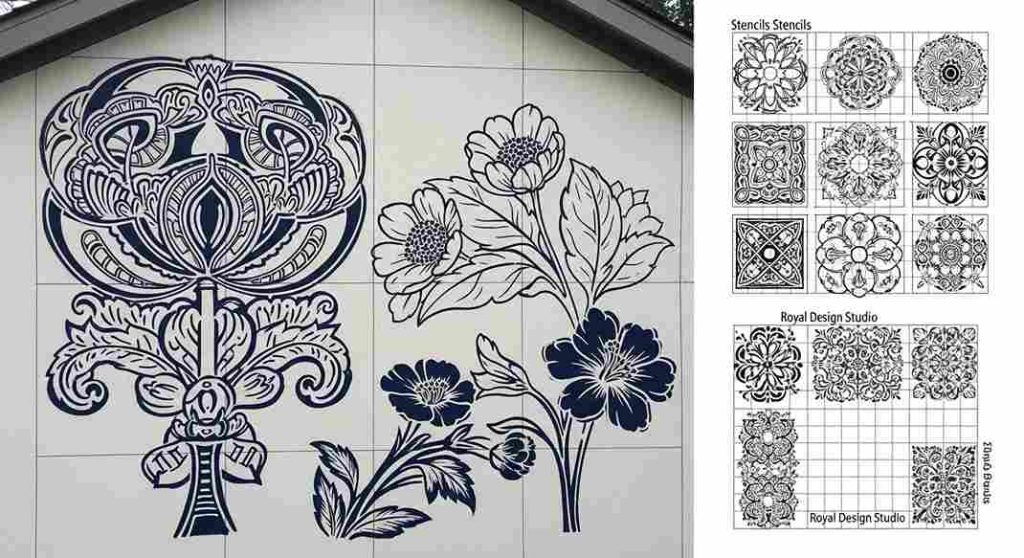
You might be surprised to learn that outdoor mural stencils do not cheat. They’re tools. Professional muralists are constantly using grid systems, snap lines and projection equipment. Stencils can be used to accurately transfer a design onto a large surface.
Stencils are a great way to get creative with your own DIY wall painting projects. Cutting Edge Stencils has large-scale patterns that repeat (from $35 to $85 each) and produce impressive results for garden walls, garage exteriors, and privacy fences. Royal Design Studio offers a wide range of botanical and geometric designs in the $45-$95 price range.
Grid method is ideal for large custom designs. Divide your image reference into equal squares. The grid can be drawn lightly with chalk on the wall (it will wash off later). Each square must be transferred one by one. This sounds difficult, but it is actually fast and accurate. No artistic skills are required.
Brick Wall Mural: Working with Texture and Not Against it

People are intimidated by outdoor brick wall murals because they have a rough surface. Once you stop fighting this, it can be a great creative advantage.
Brick texture adds dimension and depth to painted designs that a smooth wall cannot. Paint a forest over brick, and the mortar lines will suggest shadows between trunks. The texture of an ocean wave creates a sense of motion.
Paint on bricks requires more paint in terms of quantity than painting smooth surfaces. Plan to use between 30 and 40% more than the same area painted with smooth surface. Paint the mortar lines with a high-quality masonry tool that has stiff bristles. This is much better than using a roller. Once the first coat has been applied, a foam roller will help smooth out the fills.
Brick wall murals: Easy ideas to decorate your walls

There are many techniques that can be used to create beautiful artworks, regardless of your skill level. These include: large geometric color blocks in one color (tape sections off with exterior painter’s tape for crisp lines), simple botanical silhouettes on a large scale in a single contrast color or a sunset gradient made up of three to four blended colours applied horizontally.
On a brick fence with bare bricks, a straight gradient of sunset colors from terracotta to peach at the bottom, and pale yellow at top, takes four hours. It looks stunning. No drawing skills required.
Colorful Mural Ideas for Outside
Here is where inspiration and practicality meet. Each of the ideas below is suitable for a wide range of skills, can be adapted to fit most backyard walls and use colors that will last outdoors if painted with exterior acrylics.
Tropical Jungle Canopy

The resort-like atmosphere is created by giant monstera leaves, bananas fronds and birds of paradise in warm corals and yellows. Layer darker shadows on top of the mid-green leaf shapes, and then add lighter details to the veins. This design is forgiving of imperfections — the more natural and imperfect the leaves look, the better they will appear. This design looks great on wood or stucco fence panels.
Desert Sunset Gradient

The horizontal color wash will move from deep burnt sienna to peach, dusty rose and pale gold. Once the gradient has dried, add a simple saguaro silhouette in near-black. It is one of the easiest outdoor wall art projects to do yourself. The project looks professional and requires no artistic skills. Total cost of paint: about $40.
Geometric Color Block Grid

Tape the wall in bold rectangles or squares with exterior painter tape. Fill each section in a different saturated colour — cobalt, mustard, yellow, terracotta sage, warm white. Peel off the tape when paint is still a little wet to get clean, crisp lines. This design is equally stunning on brick or smooth surfaces. It also makes a great backdrop for outdoor dining.
Under the Sea Scene

The background is a deep navy or teal with fish, sea turtles and flowing kelp painted in coral, turquoise and soft gold. It works well around water features or pools where the theme is carried into the landscape. The bold darks in the background really make the fish colors stand out without the need for precise brushwork.
Wildflower Meadow

Paint a loose field of poppies in reds, purples and yellows. Begin with a soft green upper two-thirds and a pale blue upper third. Then dab on flower shapes using a round paintbrush or even a sponge. There is no need for outlines. It’s all about the looseness. This style of garden mural painting connects painted walls with real planted borders, in a way which feels totally intentional.
Bold Abstract Color Field

Think of three to five large organic shapes that are in different colors and contrasts, which overlap on the wall surface. Imagine a deep teal with warm orange edgesd in cream. This is a great DIY mural that will look contemporary and modern in any outdoor space. It requires no drawing skills, just a little confidence. Use a flat, large brush. Do not be precise with the edges.
Celestial Night Sky

This background is a deep indigo-to-navy gradient, with stars of varying sizes and a crescent moon in dusty pink and purple. This looks great on walls in the shade that face north, as a dark backdrop doesn’t interfere with the surrounding light. Use exterior metallic craft paint to add a few accents in gold. Golden’s Iridescent Series holds up surprisingly well outdoors.
Vintage Botanical Illustration

A clean cream background is paired with botanicals painted in large scales — an oversized rose or pomegranate cut into sections, a branch of eucalyptus — and rendered in rich detail on the pale base. This style is perfect for period gardens and homes. If you are hesitant to draw detailed lines by hand, outdoor mural stencils can be purchased from vendors such as Cutting Edge Stencils.
Sunrise Mountain Range

The silhouetted peaks are in charcoal, navy, or peach against a sunrise sky that moves from pale yellow at the horizon to warm pink and lavender on the top edge. The large brick wall murals are simple, architectural and striking. From a distance, the mountain ridge can appear rough and hand-cut.
How to DIY a wall mural: A practical start-to-finish process
Most guides will skip this part — the real workflow in actual time.
Step 1 – Plan your design (between 1 and 2 hours).
Measure the wall. Create your design using Canva, or on paper. Measure the wall. Before buying any paint, decide on a design.
Step 2 – Gather materials (80-250 dollars depending on the scale).
Paint trays, UV varnish and paint trays for exterior acrylic paints.
Step 3 — Prepare the surface (2-4 hours + 48-hour dry time).
Wash, repair, prime. This step determines if your mural will last three years or 13 years.
Step 4 – Transfer your design.
Use a grid method, a transfer in chalk, or stencils. Work in pencil or chalk — both disappear under paint.
Step 5 – Start by painting the background color first and then add details.
The foundation is laid by large areas of color. Midtones follow. Last are the fine details and outline. Every professional follows this sequence, regardless of the style or complexity.
Step 6 – Seal the mural.
Apply two coats of UV resistant exterior varnish. After the final paint coat, wait 72 hours before applying varnish.
The time required to complete a typical outdoor wall art project of 8 x 10 feet is one weekend, plus the drying time. Materials cost ranges from $120 to 200 for a piece that is well executed.
FAQs
The real reason most DIY murals fail (and how yours won’t).
The majority of do-it-yourself murals fail because the painter did not have enough skill, but rather because they invested too little in materials and preparation. A $20 can interior latex painted on a garden wall that has not been primed will look terrible by April. A well-planned design with exterior acrylics applied to a properly prepped surface will look great for years.
The difference in investment between the two methods is about $80. The difference in outcome is huge.
The blank canvas of your backyard wall has been waiting for you. With better paint technology and stencil options available, as well as an online community of outdoor wall art creators, 2025 will be the best time to create something that truly reflects you.