
Best Method How To Replace a Subfloor
The replacement of a subflooring system beneath a wall can be required when the subfloor has been damaged by water or has become structurally unsound. It’s a time-consuming and labor-intensive project that requires a thorough understanding of building skills. Subfloors are a sturdy foundation beneath the floor which is essential for the stability of your room’s walls and floors.
While it’s not the principal support system, such as beams, posts, or joists, it does its part. The replacement of a subfloor may turn into a bigger task, requiring the assistance of professionals if the subfloor is situated beneath an exterior wall or load bearing wall. In some cases you may be able to take off a part of the subfloor and not take away the wall.
Wall and Floor Basics
Floors and walls are connected to form a structurally solid system. From the bottom to the top, the typical home structure could look like this:
- Joist Floor joist an extended horizontal piece of wood typically two inches in size, such as 2×8 or 2×10 inches which is used to support flooring.
- Subfloor It is secured on top to the upper joist. It is typically 19/32-inch or 1 1/8-inch thick wood or OSB Subfloors can continue to run across the joist or two subfloor sections could join on the Joist.
- Underlayment: Some floors come with an underlayment with a thin thickness that assists in smoothing the floor prior to the flooring. There aren’t all floors that include this.
- Flooring: A flooring may be laminate flooring vinyl tile or luxury vinyl planks, or a different kind of floor.
Wall plate that is bottom The wall plate at the bottom is the lowest section on the wall. It’s usually an 8-foot long 2×4 piece. Wall studs are attached vertically to the wall plate. The surface of the wall is secured (downward) in the subfloor. The nails are even extended to the floor joist. Everything else, except for floor covering and underlayment rest beneath and are attached to the wall plate’s bottom.
Signs You Need to Replace Your Subfloor
Moisture is usually the primary reason for subfloor damage. It can result from floods, burst pipes or even leaks. The excessive humidity may also cause damage and also from inadequate installation.
There are some signs to watch out for to tell you it’s time to change the subfloor in your home:
- Squeaky floors
- Uneven floors
- A musty odor
- A loose toilet
- The floors moving when you walk
Removing the Subfloor Under Walls
Moving the subfloor once the wall is still in place is a challenge since the floor is encased in the wall. It’s like taking a book and nailing it to the floor while the person who is sitting on it. It’s possible to do it however it requires some patience and effort. Keep in mind that if your goal is to maintain the wall the wall will be able to take off a portion of the subfloor. To remove the subfloor over the entire wall, you’ll have to take the wall down. The most secure width for removal is 14 inches, as it represents the space between two joists, or two studs.
Although it might be appealing for you to install a subfloor from beneath in the event that your home is accessible from the basement into the area, it must always be replaced at the top. Replace a damaged or water-damaged unsafe structurally weakened subfloor by removing the floor covering and sublayment over it, and then cutting the old subfloor and putting in the new floor.
Before You Begin
On the electric service panel, switch off any circuits running into the area in which you’ll be moving the subfloor. Turn off all infected water line. If you have interconnected water shut-offs, close the water off there. If not, shut off the water to the entire home at the valve that shuts off water to your main supply.
What You’ll Need
Equipment / Tools
- Flat pry bar
- Circular saw
- Utility knife
- Oscillating multi-tool as well as a metal blade
- Hand saw
- Drill
- Nail puller
Materials
- Bags for trash that are heavy-duty
- Eye protection
- Ear protection
Instructions How to Replace a Subfloor Under a Wall
Remove the Baseboard
Use the flat bar to gently take off the baseboard as well as any trim with a quarter-round design near the area you want to take off the subfloor. Place these pieces aside.
Remove Sections of Drywall
Take out drywall pieces that be extending over your floor. When this happens, remove an area to the required length and approximately 1 foot in height. Take any garbage away in a trash bag that is heavy-duty.
Remove the Floor Covering
Remove the floor covering right over the subfloor you wish to take off. Also, cut several inches more to allow yourself more space to work. Certain flooring coverings can lift off with ease, whereas others require cutting.
It should be possible to lift any laminate or luxurious vinyl plank floors that is installed in parallel with the wall. Self-adhesive vinyl tiles can be removed, and sheet vinyl is easily pulled back. Ceramic and porcelain tiles should be broken and the mortar that holds it in place must be removed. Engineered wood and solid hardwood flooring laid in parallel to the wall can be pulled off, but some boards might end up damaged.
Remove Any Underlayment
Take off any thin layer of underlayment between the floor and the subfloor covering. Cut off a portion using the knife used for laminate flooring that is covered with felt or foam underlayment. For luan that is 1/4 inch in size (plywood) sublayment piece Set the circular saw to the right depth to cut just into the luan and not any other material beneath it.
Cut Away the Nails
Attach the metal cutting blade to the multi-tool that oscillates. Wearing hearing and eye protection, switch on the tool, and then insert the blade beneath the wall’s bottom plate. Take away any nails that extend downwards from the wall plate’s bottom.
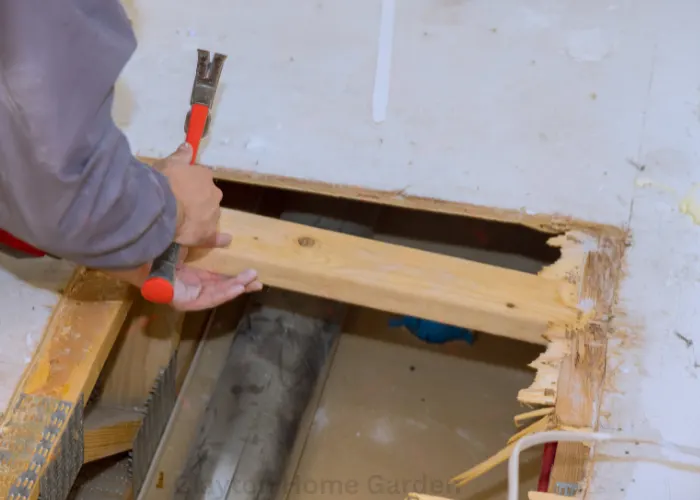
Cut Away the Subfloor
Adjust the circular saw to the appropriate depth for cutting just the subfloor and none of the material below the subfloor. Be aware this: the circular saw will not cut completely flush with the wall, so you must make cuts as close as can close to it. Many saws will permit cutting within one inch or so. Continue making two more cuts using the hand saw along the sides of the square cut out until you are at that wall’s lowest plate. more cuts are made using your handsaw along the edge of the square cut out until you get to that wall’s lower plate.
Remove the Subfloor From Under the Wall
Removing the remaining portion of subfloor and take it off it manually if the subfloor has been severely damaged. If not, connect an auger bit that is 3/4 inches long with the drill. Drill up to the thickness of three and a half inches beneath the wall’s bottom plate to both the sides of your damaged section. The auger bit acts as a saw, cutting through the wood. If the part of the floor is resting on the joists, the part of the subfloor will pull out. If not, move with the following step.
Remove Subfloor From the Other Side (If Necessary)
Repeat the steps above on the opposite aspect of your wall in case you have a subfloor that is continuous that extends out beyond wall. If not, you won’t be able to remove the area is being worked on.
Inspect the Joists
The removal of the subfloor allows you to have a clearer view of the joists. If the joists have been damaged, repair their damage, or even replace them immediately. In most cases, you can strengthen damaged joists using another support joist with strong-duty adhesives.
Install New Subfloor
Install a new subfloor by cutting and measuring the new portion of subfloor to match the area. When you’re using tongue-and groove or plywood flooring, ensure that the joint is aligned with the joint. Install the plywood by screwing it on the joints. The addition of glue helps lessen creaking or squeaking sounds.
Install the Top Flooring
If the flooring is in good condition it is possible to put it back in place like engineered wood planks carpeting, or even replace the entire floor. If it’s a problem location, for instance one susceptible to leaks, you should consider waterproofing.
Tips for Replacing Subflooring
Install subfloors from above
It might seem simpler to get subflooring removed from beneath, for instance when you live in a basement that is not finished and you can observe the subflooring. However gravity is at your back from this angle. You’ll have an improved view from the top and will be able to more easily take out old nails and other construction materials.
Flooring with tongue and groove is more secure
If you’re weighing whether to go with the traditional sheets of plywood, or subflooring, opt for tongue-and-groove to ensure a more robust, more secure connection. Additionally, you can use adhesive to provide an even more secure hold.
Make room for expansion and contraction
Particle and wood boards are porous, and expand and shrink in response to humidity, heat, as well as cold temperatures. Make sure you leave 1/8 inch of space between the sheets as you lay them out the subfloor.
Give the wood the time to adjust
Plywood and subflooring materials need to be allowed a few weeks to adjust themselves to temperature and humidity prior to being laid. The wood could expand or contract in the period of.
Smooth your edges by sanding the edges or corners of the panels that protrude out or up. Check that the floor is smooth and level.
Be real regarding the scope of work
A lot of people underestimate the amount of the work involved in a project. It’s easy to replace subflooring however, if it’s damaged and extends beyond a wall, it may need the wall (or or a portion or a portion of it) to be taken down. You should consider contacting a contractor in case a project appears to be an overwhelming task for you. It may be more affordable, quicker and easier to hire a professional to assist.