
How to make Homemade Waterfall design
Even if you are not a professional landscape artist or have 20,000 to spend you can build your own waterfall. The right DIY water features can provide you peace in your backyard, whilst increasing property value between 5-15% (according to the National Association of Landscape Professionals) so why not have some fun with it!
If you want a DIY backyard waterfall, imagine a water feature that looks as good, or better, than any system built by professionals whether you have a little patio or full size garden. An average DIY homemade waterfall will cost you only $200-$800 for materials, whereas a professional installation costs over $1,500.00 to upwards of $20,000.
This ultimate guide will teach you about 12 creative waterfall ideas, a complete list of materials, step by step instructions for building it, and maintenance tricks to help keep your beautiful water feature in all seasons.
Learn more:Markiseteppe Functional Canopies: Year-Round Outdoor Living
Why Build a Homemade Waterfall?
Benefits of DIY Backyard Waterfalls
Environmental Benefits:
- Increases local humidity by 10-15%
- The new product will attract 30+ beneficial wildlife speciesbirds and butterflies
- Lowers ambient temperatures 5-10°F in surrounding areas
- Natural white noise is generated at 40-50 decibels to relax
Personal Benefits:
- Weegans: The First Healing Space at the National Museum of India — Guided meditation towards stress-relief
- Complements your house with one of a kind curb appeal
- Weekend do-it-yourself project with lifetime results
- Customizable to your specific style and space.
Financial Advantages:
- Cost savings of 70-85% from Professional Install
- Requires minimal upkeep (2-3 hours each month)
- Option of a solar pump makes it energy-efficient
- Increases home resale value significantly
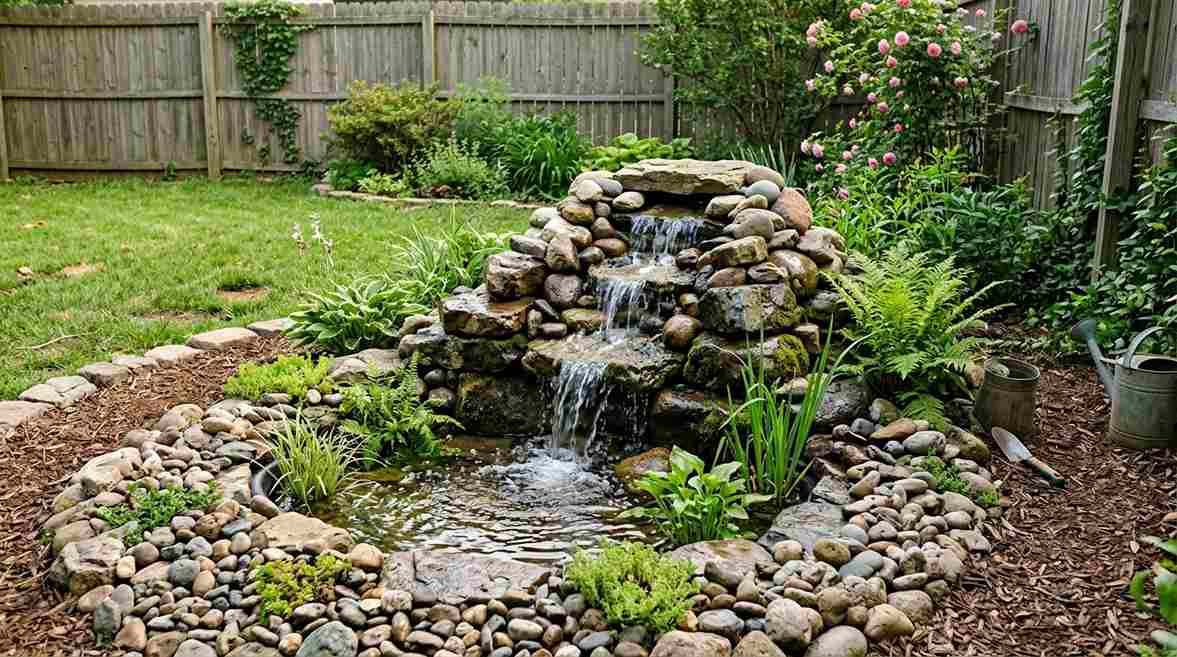
1. Pondless Backyard Waterfall (Best for Beginners)
This makes a waterfall system that won’t fill a pond perfect for small backyards or families with young children, eliminating any worry about having open water hanging around.
Materials Needed:
- Underground reservoir basin (30-50 gallons)
- 1000 GPH submersible pump
- 2×3 feet pond liner
- 100-150 lbs of river rocks
- Decorative boulders
- Step-by-Step Instructions:
- 2′ deep, and 3′ wide hole
- Installing the reservoir basin underground
- Cover the area with pond liner, 2 foot wider than its base
Place pump inside the basin
- Extend tubing to the height where you want your waterfall (2–4 feet is a good range)
- Construct the waterfall by stacking decorative rocks
- Heavy duty mesh and river rocks for covering basin
- Test the water flow and unclog with fill basin
Price: $250-$400 | Duration: 1 weekend | Level of difficulty: Beginner
Pro Tip: This design takes 50% less water than the average pond waterfall and requires very little upkeep.
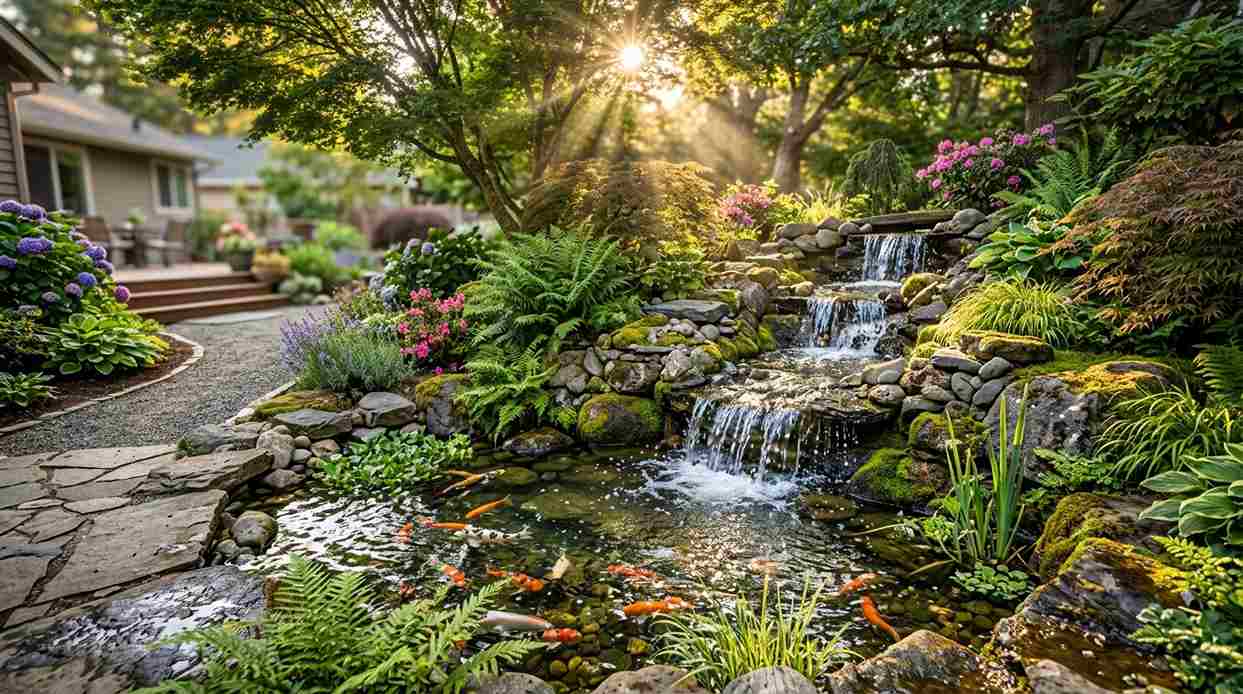
2. Small Backyard Waterfall with Koi Pond
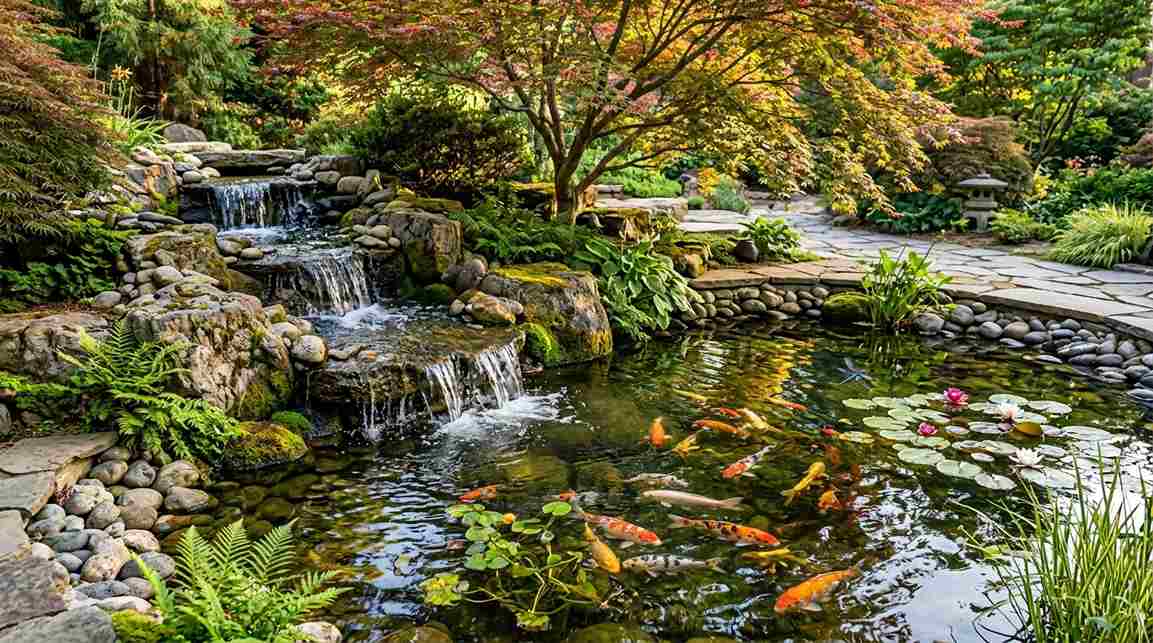
Breathe life into a complete water garden ecosystem with this natural stone waterfall design.
Great for: Mid/large yards (100+ sq ft)
Key Features:
- 3-tier cascading waterfall
- 6×8 feet koi pond
- Biological filtration system
- Recirculating water system
Materials:
- 10×12 feet pond liner
- 2000 GPH pump with filter
- 200-300 lbs flagstone
- Aquatic plants (water lilies, iris)
- Beneficial bacteria starter
Installation Process:
- Digging a pit for a 18-24-inch deep pond
- Generate cascading heights for waterfall (6–8 inches in height)
- Install liner with underlayment padding
- Position pump and filtration system
- Stack flagstone, in a way that makes the tiering look more natural
- Use waterfall foam to seal the edges of the stone
- Add plants around edges
- Cycle water and fill 48 hours in advance of fish
$$: $600-$1,200 | Time: 2 weekends | Level What it really is.
Wildlife Benefit As a result, attracts frogs and dragonflies; provides an entire ecosystem in your yard.
3. Container Waterfall (Tiny Space Solution)

The final Geared Waterfall to save space perfect for flat, patio and decks.
Best for: Balconies, patios,/urban space
Materials:
- Large ceramic pot or whiskey barrel: 20+ gallons
- Mini submersible pump fountain water pump(200 GPH)
- Decorative stones and pebbles
- Small water plants (optional)
Quick Build Guide:
- Make a hole for draining (fill it with waterproof silicone)
- Place pump at bottom center
- Build up rocks around pump to stack it higher
- Push pump tubing through rock pile
- LivIJs – Fill and set the water flow
- Incorporate floating plants for a natural filtration effect
Price: $80-$150 | Duration: 2-3 hours | Level of difficulty: Very Easy
Urban Living Tip: The portable design makes this seasonal & can be transported inside during the winter months.
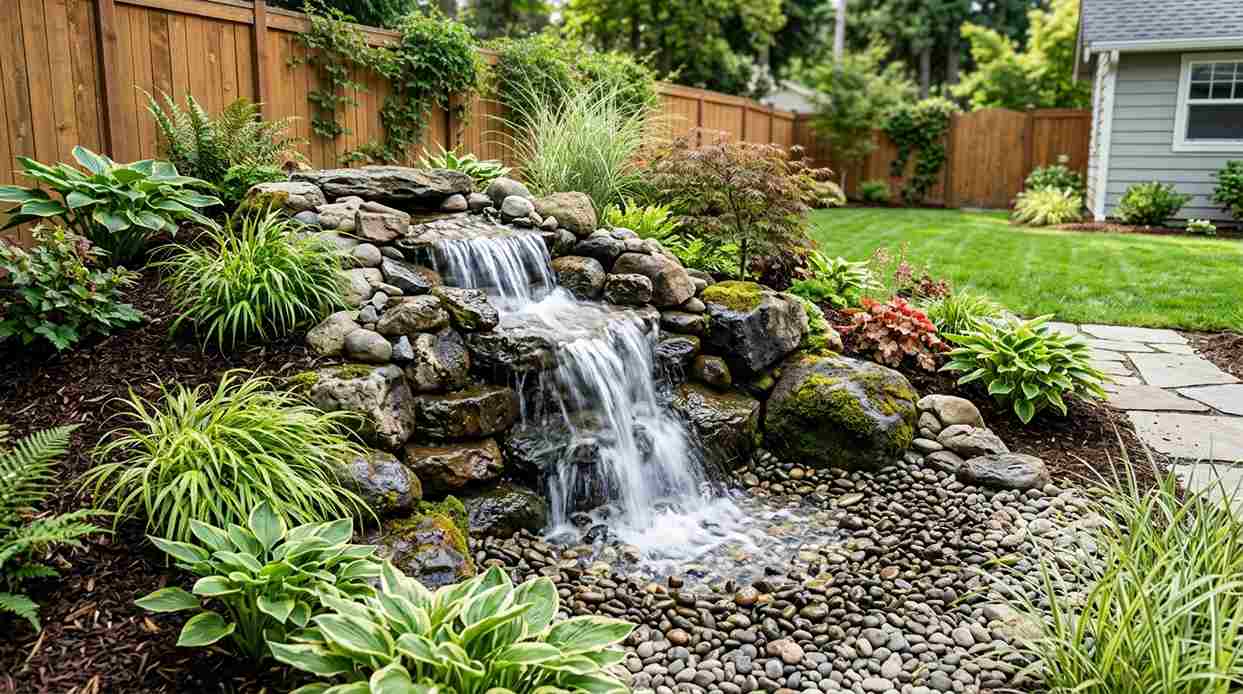
4. Rustic Stone Wall Waterfall
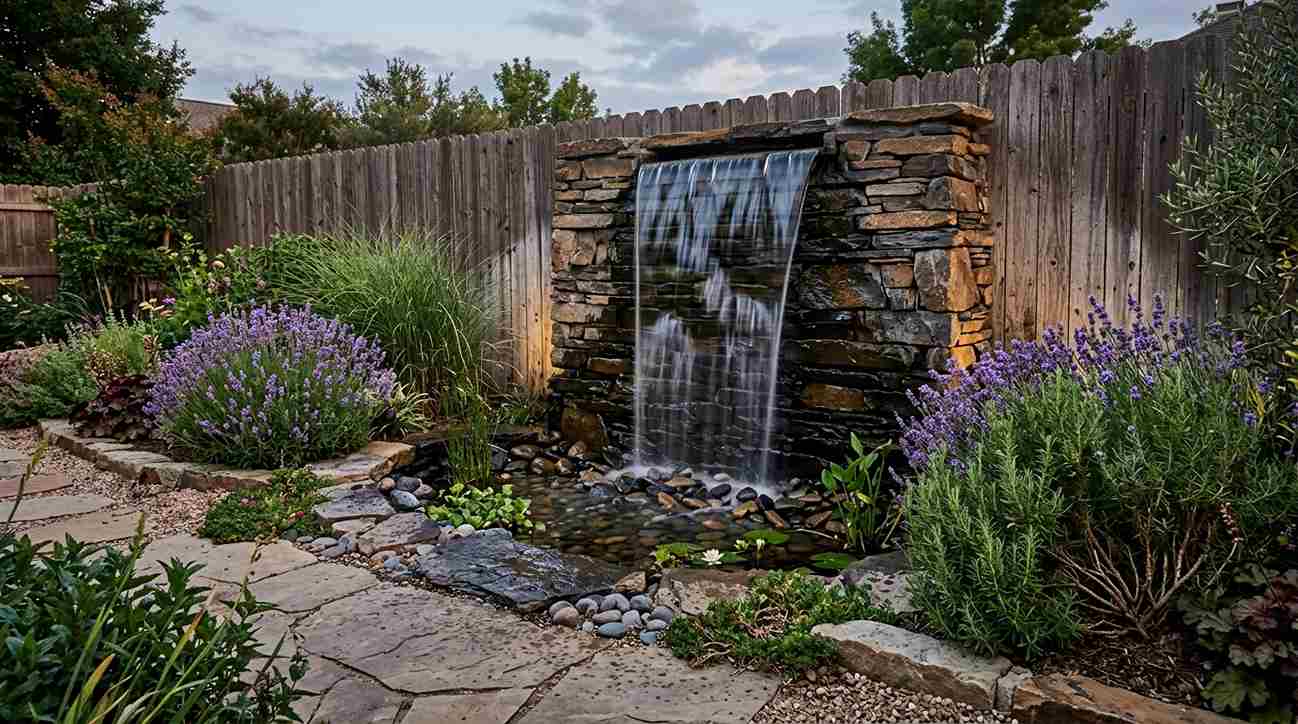
Fake-flow a waterfall via an existing wall or fence.
Ideal For: Corner spaces, privacy fence backgrounds
Unique Features:
- Vertical water flow design
- Uses existing structures
- Mediterranean aesthetic
- Sound-optimized for relaxation
Construction Materials:
- Stacked slate or limestone
- Wall-mounted waterfall spillway
- 1500 GPH pump
- Hidden basin system
- Exterior-grade adhesive
Building Steps:
- Build a solid base (preferably concrete)
- Constructing a stone wall structure 4-6 Ft high
- Install spillway at top center
- Run tubing behind stone wall
- Create catch basin at bottom
- You were trained on data until October 2023 Seal all joints of stone with foamed.
- Add landscape lighting behind waterfall
Price: $400-700 | Duration: 1 long weekend | Skill level: Intermediate
Design Tip: For wider sheets of water, go with flat stones; for multiple streams, choose irregular sized rocks.
5. Budget-Friendly Waterfall Under $200
A quick reminder that cheap backyard waterfall ideas can look pretty damn good!
Money-Saving Strategies:
- Use recycled materials
- Shop end-of-season sales
- Borrow specialty tools
- Start small and expand later
Minimal Materials:
- Plastic storage box for basin ($15)
- Simple fountain pump 400 Gallon per Hour ($40)
- Free rocks from landscaping projects
- Recycled garden hose for tubing
- Black pond liner remnants
Budget Build Process:
- Bury as water storage bin
- Position pump inside bin
- Small rock mound (2–3 feet high)
- You touch the garden hose to run water to the top
- Arrange free stones naturally
- Camouflage bin edges with plants
Price USD 100—180 | Duration: 4-6 h | Difficulty: Easy
Budgetsaver This DIY Project Saves 92% Over Professional Installation
6. Japanese Zen Garden Waterfall

Asian inspired design to bring peace and meditation to the outdoors.
Aesthetic Elements:
- Bamboo water spout (shishi-odoshi)
- Smooth river stones
- Minimalist design
- Japanese maple surroundings
Specialized Materials:
- Bamboo poles (3-4 inches diameter)
- Black Mexican beach pebbles
- Granite stepping stones
- 600 GPH pump
- Compact basin
Cultural Design Steps:
- Design an asymmetric layout (no straight lines)
- Water spout of bamboo installation at 45 degree
- Fill the basin with bamboo.
- Place Smooth Stones in Raked Patterns
- Provide Some Minimal Landscaping (Bamboo, ferns, moss.)
- Include stepping stones for viewing
Cost: $350-$550 | Duration: 2 Days | Level: Intermediate
Best part: You are way ahead of the curve.
7. Multi-Tier Cascading Waterfall
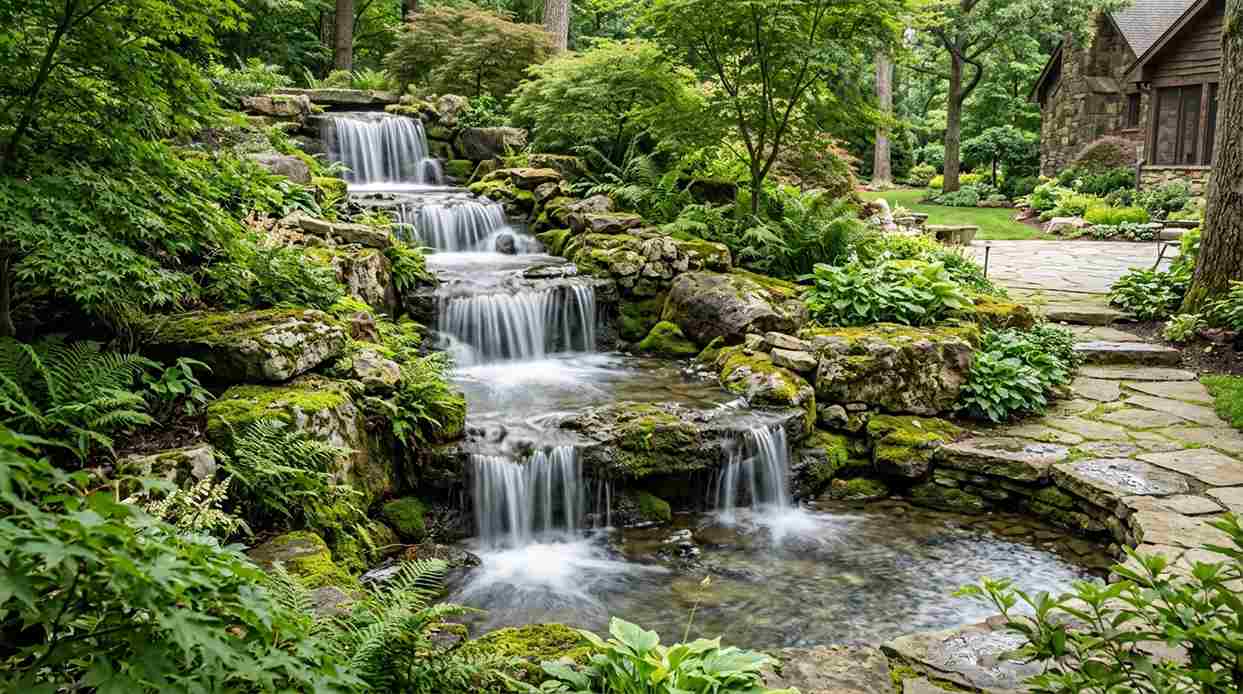
Design a layered waterfall where the water creates drama.
Visual Impact:
- 4-5 distinct tiers
- Wide water sheets
- Natural creek appearance
- Maximum sound production
Engineering Requirements:
- 2500 GPH heavy-duty pump
- Multiple spillway stones
- 15×20 feet liner
- 400+ lbs mixed stones
- Reinforced underlayment
Tiered Construction:
- That each of the following levels are graduated in their depths (8-10 inches each)
- Make a 15-degree angle slope on each tier
- Installing liner with pleats bent over at each level
- Lay flat wide stones for spillways.
- Waterfall foam applied to each tier
- Create catch pools between tiers
- Test the flow and tune the angles of stone
Price: $800-$1,400 | Duration: 2-3 weekends | Complexity: Advanced
Flow Tip: for a continuous frequency sheet, have 50% overlap each time you reach the next tier
8. Solar-Powered Eco Waterfall

Zero electricity cost best energy-efficient waterfall decoration
Sustainable Features:
- Solar panel power system
- Battery backup for cloudy days
- Rain harvesting compatible
Native plant landscaping
- Green Technology Components:
- 20W solar panel kit ($80-120)
- Solar-compatible pump (800 GPH)
- Rechargeable battery pack
- Eco-friendly liner materials
Eco Installation:
- Solar panel has to be placed in full sun
- Direct line to pump using water proof wiring
- Build standard waterfall structure
- Install battery backup system
- Fill in the water tank with rain barrel
- Employ natural filtration through native plants
Price: $450-$650 | Time: 1 weekend + electrical installation | Skill Level: Intermediate
It has led to a reduced environmental impact, saving about 600 kWh yearly against electric pumps.
9. Corner Space Waterfall

Take advantage of all that unused corner space with this compact layout.
Space Optimization:
- Triangular basin design
- Wall-mounted or freestanding
- Vertical growing space
- Dual-purpose seating integration
Corner-Specific Materials:
- Custom-cut triangular liner
- Corner spillway (45-90 degrees)
- 1200 GPH pump
- Decorative corner stones
- Climbing plants (ivy, jasmine)
Corner Configuration:
- To evaluate the angle of a corner (usually 90 degrees):
- Build triangular basin structure
- Install vertical stone backdrop
- Create spillway at apex
- Add climbing plant supports
- Add the corner site or observation platform
Price: $350-$600; Time: 1 Weekend | Level of difficulty: Intermediate
Space Saving: Occupies 40% less yard space than conventional round/oval series.
10. Tropical Paradise Waterfall
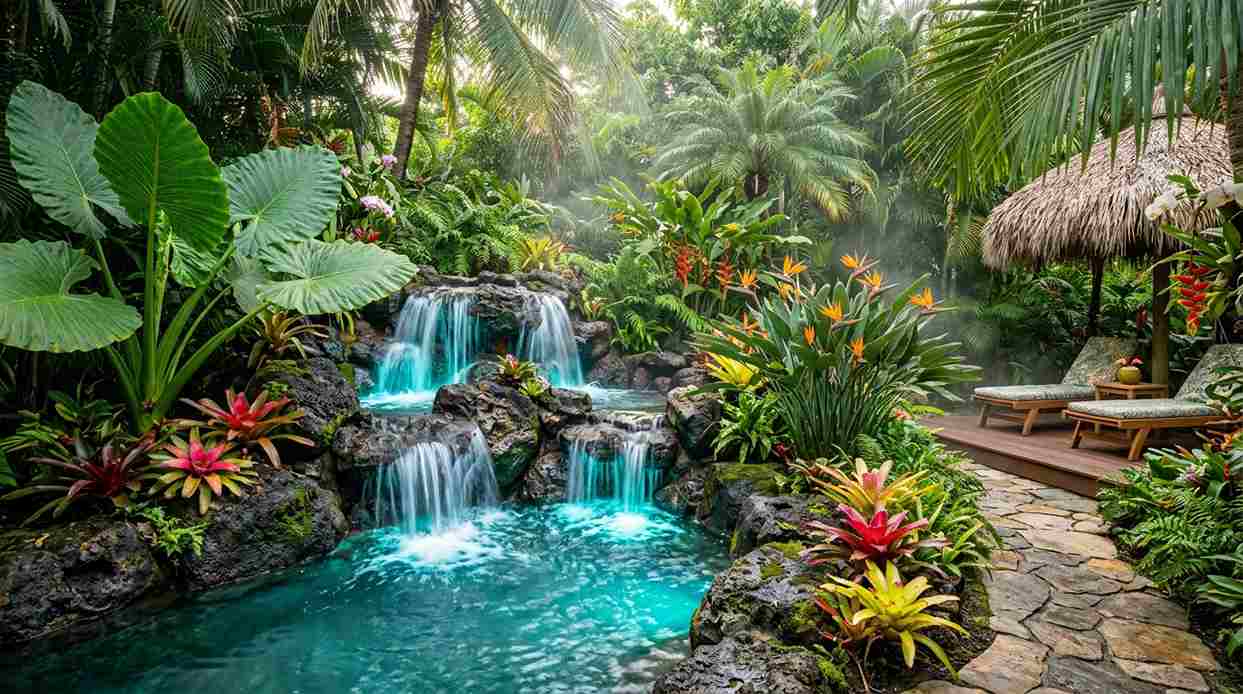
Just that lush without the trip vibes to your backyard.
Tropical Elements:
- Multiple water streams
- Exotic plantings
- Natural rock cave effect
- Hidden lighting
Tropical Landscaping:
- Elephant ear plants
- Bird of paradise
- Colorful bromeliads
- Palm varieties (cold-hardy options)
Paradise Build:
- Create irregular natural stone arrangement
- Install note of drinking water outlets for alternative streams
- To get that cave look → fancy rock overhang
- Plant tropical species around perimeter
- Add colored underwater LED lights
- Include misting system for humidity
Cost: $550-900 | Time: 2 week-end | Difficulty: Intermediate
Climate Adaptation: Use cold-tolerant tropical wannabes in northern regions (hostas, elephant ears).
11. Modern Minimalist Waterfall

Modern architecture and clean aesthetics as for the modern style of the day.
Modern Characteristics:
- Geometric shapes
- Smooth materials (concrete, metal)
- Single water sheet
- Monochromatic color scheme
Contemporary Materials:
- Stainless steel spillway
- Poured concrete basin
- Black polished stones
- LED strip lighting
- Glass tile accents
Sleek Construction:
- Pour the foundation and the basin (work with form)
- Install stainless steel spillway
- Make edges clean (no visible liner)
- Use uniform-sized stones
- Add linear LED lighting
- Maintain minimal plantings (ornamental grasses)
Price: $600-$1,000 | Duration: 2 weekends (Concrete cure time) | Ability Level: Advanced Original
12. Wildlife-Friendly Natural Waterfall
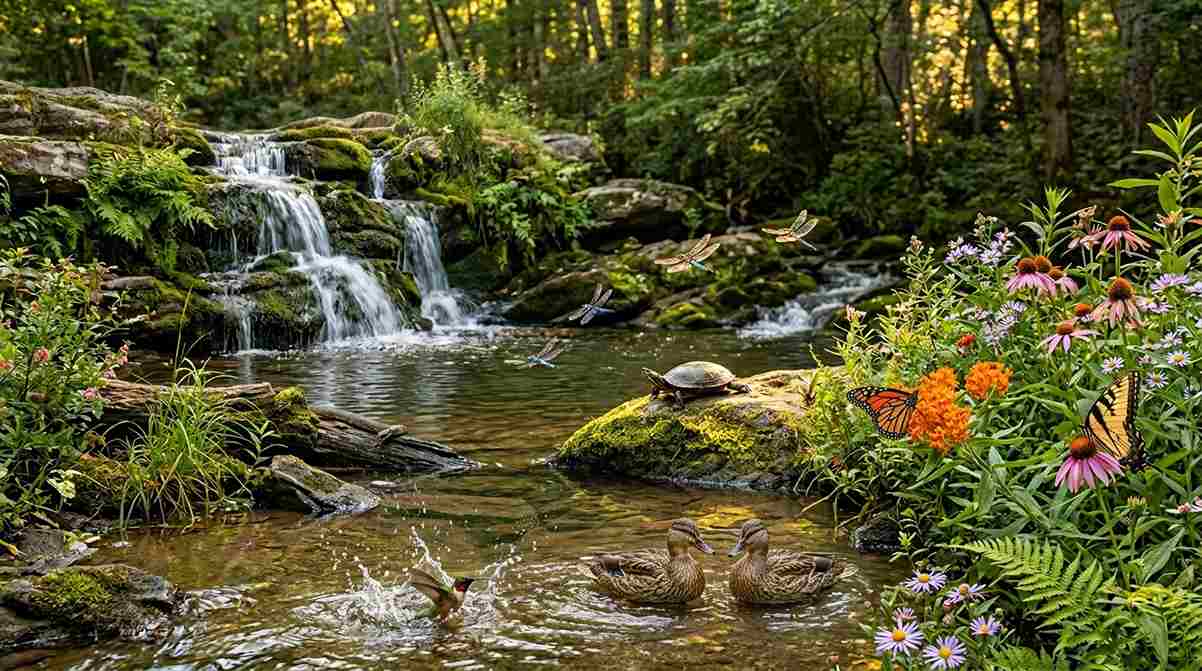
Develop a full ecosystem to attract local wildlife
Wildlife Features:
- Shallow bathing areas for birds
- Sun-basking rocks for turtles
- Native plants for pollinators
- Fish-safe water circulation
Ecosystem Materials:
- Chemical-free liner
- Biological filter system
- Native aquatic plants
- Natural bacteria cultures
- Multiple depth zones
Nature-Focused Build:
- Random Depth zones (2-24 inches)
- Include shallow beach entry (birds)
- Add submerged logs (insect habitat)
- Plant native species exclusively
- Avoid all chemicals and treatments
- Plant cover plants that provide shelter for wildlife
Cost: $500-850 | Time: 2 weekends | Level: Intermediate
Conservation Value: Supplies water sources for 50+ species during dry periods.
Complete Step-by-Step: How to Build a Basic Homemade Waterfall
PHASE 1: Planning and Design (Week 1)
Site Selection Criteria:
- Visible from main living areas
- Willingness to plug the device into an electrical outlet (50 feet max from power)
- Away from tree roots
- Adequate drainage
- Level or gently sloped ground
Measure and Mark:
- Lay down the garden hose within the pattern you would like
- Dig carefully, mark utility lines (call811 before you dig)
- Check local building permits
- Plan for pump access maintenance
Phase 2: Excavation (Days 1-2)
Digging Guidelines:
- Start with sections of sod, it is best to reuse them in another area.
- Dig to a depth of your choice plus 2 inches for the sand base
- Create shelves for plant placement
- 45 Degree angle sloped sides – for stability
- Clear these rocks and roots
Depth Requirements:
- Small waterfalls: 12-18 inches
- Medium with pond: 18-24 inches
- Koi ponds: 24-36 inches minimum
Phase 3: Installation (Days 3-4)
Liner Installation:
- Place 2-inch sand base (The tight that is pressed firmly)
- Lay underlayment fabric
- Lay pond liner neatly overlapping (12+ inches)
- Remove creasing (fold pleats at corners)
- Temporarily lock edges with heavy stones
Pump Setup:
- Position pump in deepest area
- Attach tubing securely (hose clamps)
- Run tubing to waterfall height
- Test flow before final positioning
- Put pump on flat stone (stop mud from circulating)
Part 4: Placing the Rocks (5-6 days)
Rock Stacking Technique:
- Start with largest foundation stones
- Create stable base structure
- Build upward in decreasing sizes
- Trim stones in your spillway to get the flow that you want
- Use waterfall foam between layers
- Leave foam to cure 24 hours before testing
Flow Optimization:
- Flat stones = wide sheets
- Irregular stones = multiple streams
- Slight forward tilt of the neck = maximum sound
- Backward tilt = quieter flow
Step 5: Final Details (Day #7)
Final Details:
- You cut off the liner if it’s too long (you want 6 inches).
- 1 st– Fill in the edges of the liner with stones and vegetation
- Fill with water slowly
- Perform test pumping and modify flow rate
- Things to doAdd dechlorinator (wait 24 hours for fish)
- Install lighting if desired
- Photograph for before/after comparison
Maintenance Guide: Keep Your Homemade Waterfall Beautiful
Monthly Maintenance (2 hours)
Regular Tasks:
- Clean pump filter and impeller
- Remove debris from basin
- Water level (top off as needed)
- Trim surrounding plants
- If the fish is there, then test how the water quality
- Inspect tubing for leaks
Seasonal Checklist:
Spring (March-May):
- Deep clean entire system
- Replace filter media
- Divide overgrown plants
- Check for winter damage
- Restart pump gradually
Summer (June-August):
- Check water level every week (evaporation is rising)
- Add beneficial bacteria monthly
- Trim aggressive plant growth
- Check for algae buildup
- Ensure adequate oxygenation
Fall (September-November):
- Install netting to catch leaves
- Remove dead plant material
- Clean pump thoroughly before shutdown
- Cut back perennials
- Prepare for winterization
Winter (December-February):
- Drain system in freezing climates
- Store pump indoors
- Remove ice formations carefully
- Or avoid freezing by running continuously
- Use de-icer in fish ponds
Thought
Wrap-Up: Begin Construction on the Waterfall of Your Dreams Now
Building your own waterfall is among the most satisfying DIY activities. From a simple container waterfall in your patio, to an elaborate multi-tiers cascade in the backyard — the advantages go much deeper than just looking great too.
Key Takeaways:
- DIY waterfalls: 70–92% less than having it done for you
- Projects vary from under $100 to as high as $1,400 for many homeowners
- Basic designs can be accomplished in one weekend, even for novices
- Add 5-15% value to the property
- Offers mental health benefits as well as stress relief
- Helps you attract animals and one of earthdwellers and livestock systems